Got a new startup business and a WordPress site? Using MailerLite for email marketing automation? What if we tell you that you can connect your MailerLite with WordPress forms within clicks? Interesting, isn’t it? Then this article is just for you.
Stay rest assured, by the end of this article, you will be able to connect your MailerLite with WordPress form in no time. So, till then, stick around!
MailerLite: All-in-One Beginner-Friendly Digital Marketing Solution
When we talk about popular digital marketing automation tools and services, MailerLite comes forth as one of the best beginner-friendly email service providers.
Its easy-to-use, affordable and simple configuration makes it quite the preferable option for anyone who is looking for the best marketing solution for their startup.
Along with its drag & drop email campaign builder, some of the noteworthy features include,
- Autoresponder for sending new subscribers automated emails.
- Advanced targeted automation for reaching specific user groups.
- Easy and sleek website, landing page and sign-up form builder.
- Resourceful e-commerce marketing and tracking tools.
So, if you are in search of the best deal as a beginner and do not want to break your bank, we wholeheartedly recommend MailerLite as your all-in-one digital marketing solution.
And to up your game, Forminix Form Builder has brought their latest feature that allows you to connect your MailerLite with WordPress form in a matter of clicks.
More about it in short.
Forminix Presents: The New WordPress MailerLite Integration
WordPress MailerLite integration is another latest addition to your very own Forminix Form Builder plugin.
This new feature allows you connect your MailerLite with WordPress forms on your site without any hassle. The whole setup is very user-friendly and will take mere minutes to complete.
So, if you are a MailerLite user, you can now easily collect your user info and send them from your WordPress to MailerLite subscriber group.
In this tutorial we will take you through all the necessary steps you will need to complete your setup.
So, without any further due, let’s begin.
NOTE: Before we get started it is recommended that you update your existing Forminix plugin to the latest version. However, if you don't have the plugin installed yet, you can check out the pricing plans from here.
Connect MailerLite with WordPress Form in 5 Steps
Before we get down to the process, a quick heads up for you.
If you haven’t yet created your MailerLite account, we recommend following this guide on how you can get started with MailerLite. Afterwards, visit this MailerLite signup page to create your first account and finish setup. Then you can continue following this tutorial.
For sake of this tutorial, we have created a custom contact form. With this form we will collect user inputs and send them from our WordPress to MailerLite subscriber group with each submission.
The reason for collecting specific form field inputs is to use them as subscriber profile info in our MailerLite subscriber list.
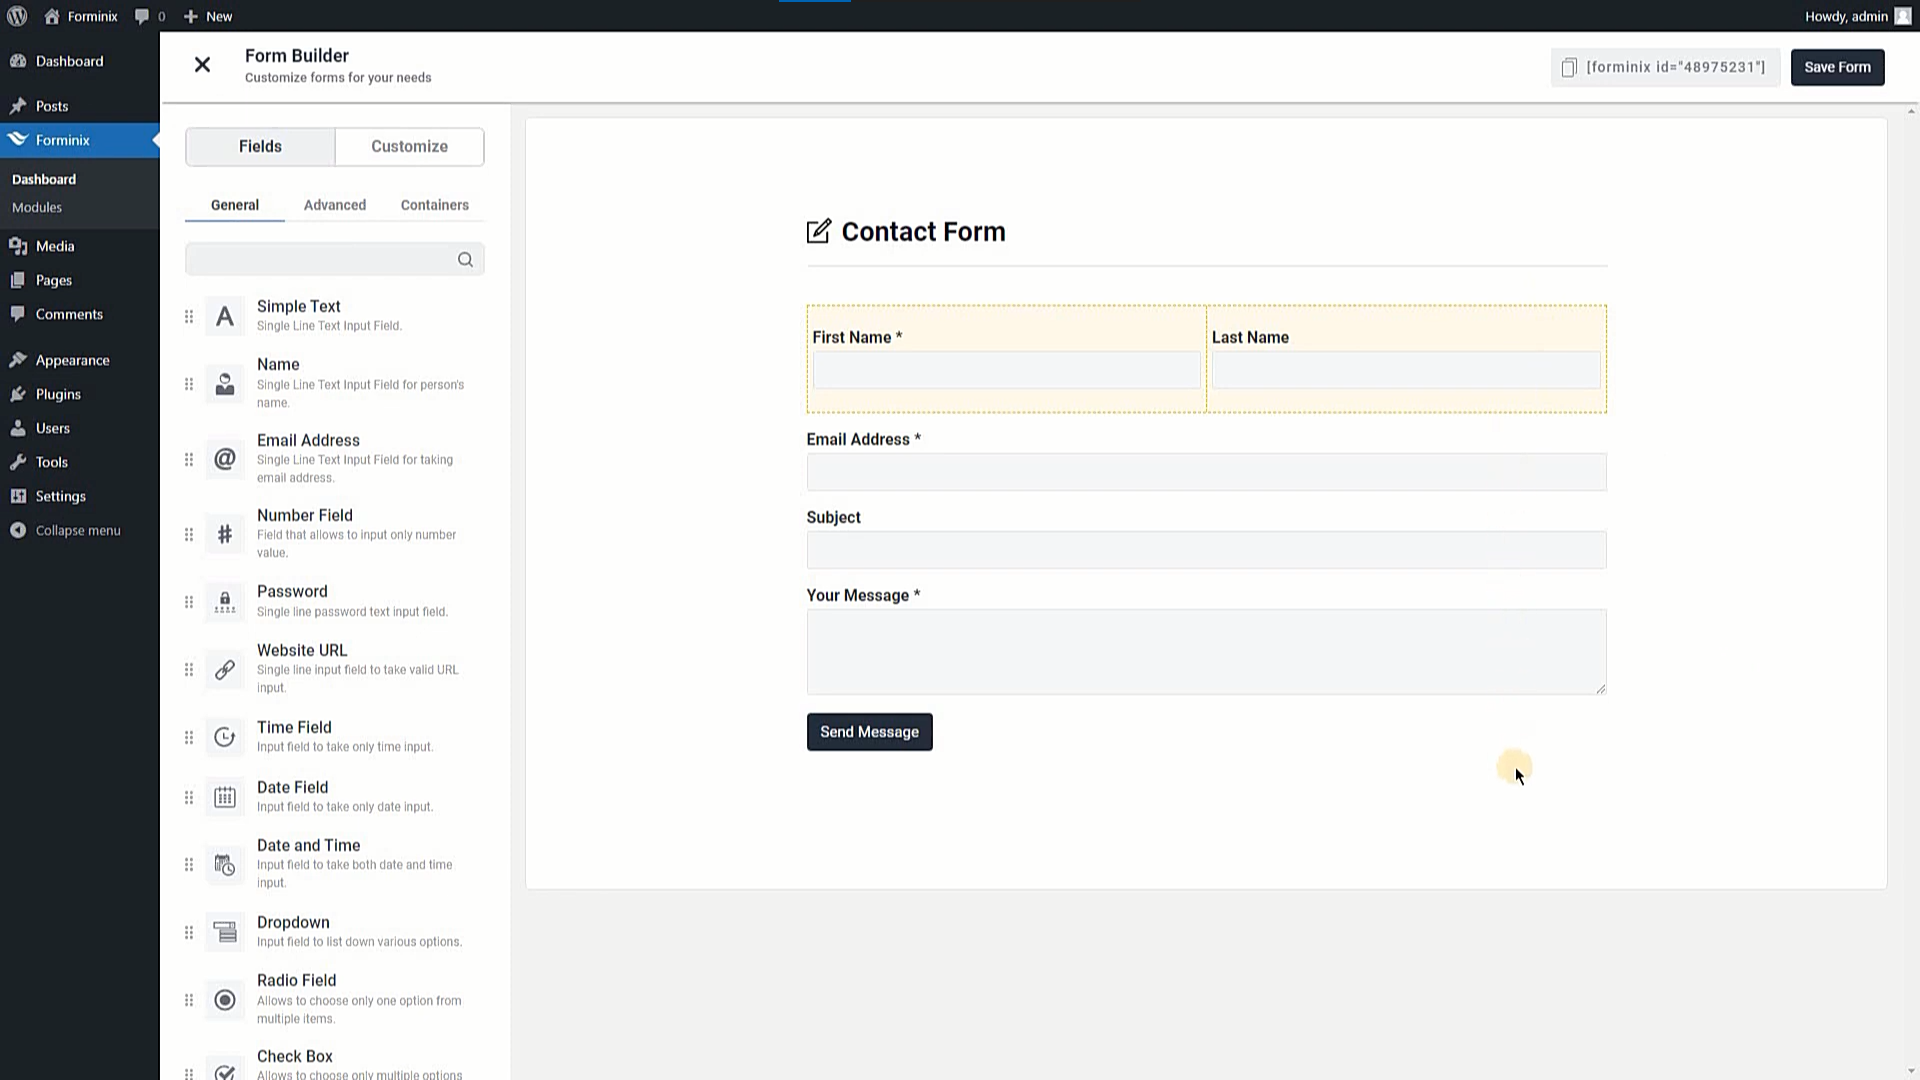
However, you can create and use any type of form you need in this regard.
Step 1: Enable the WordPress MailerLite Integration
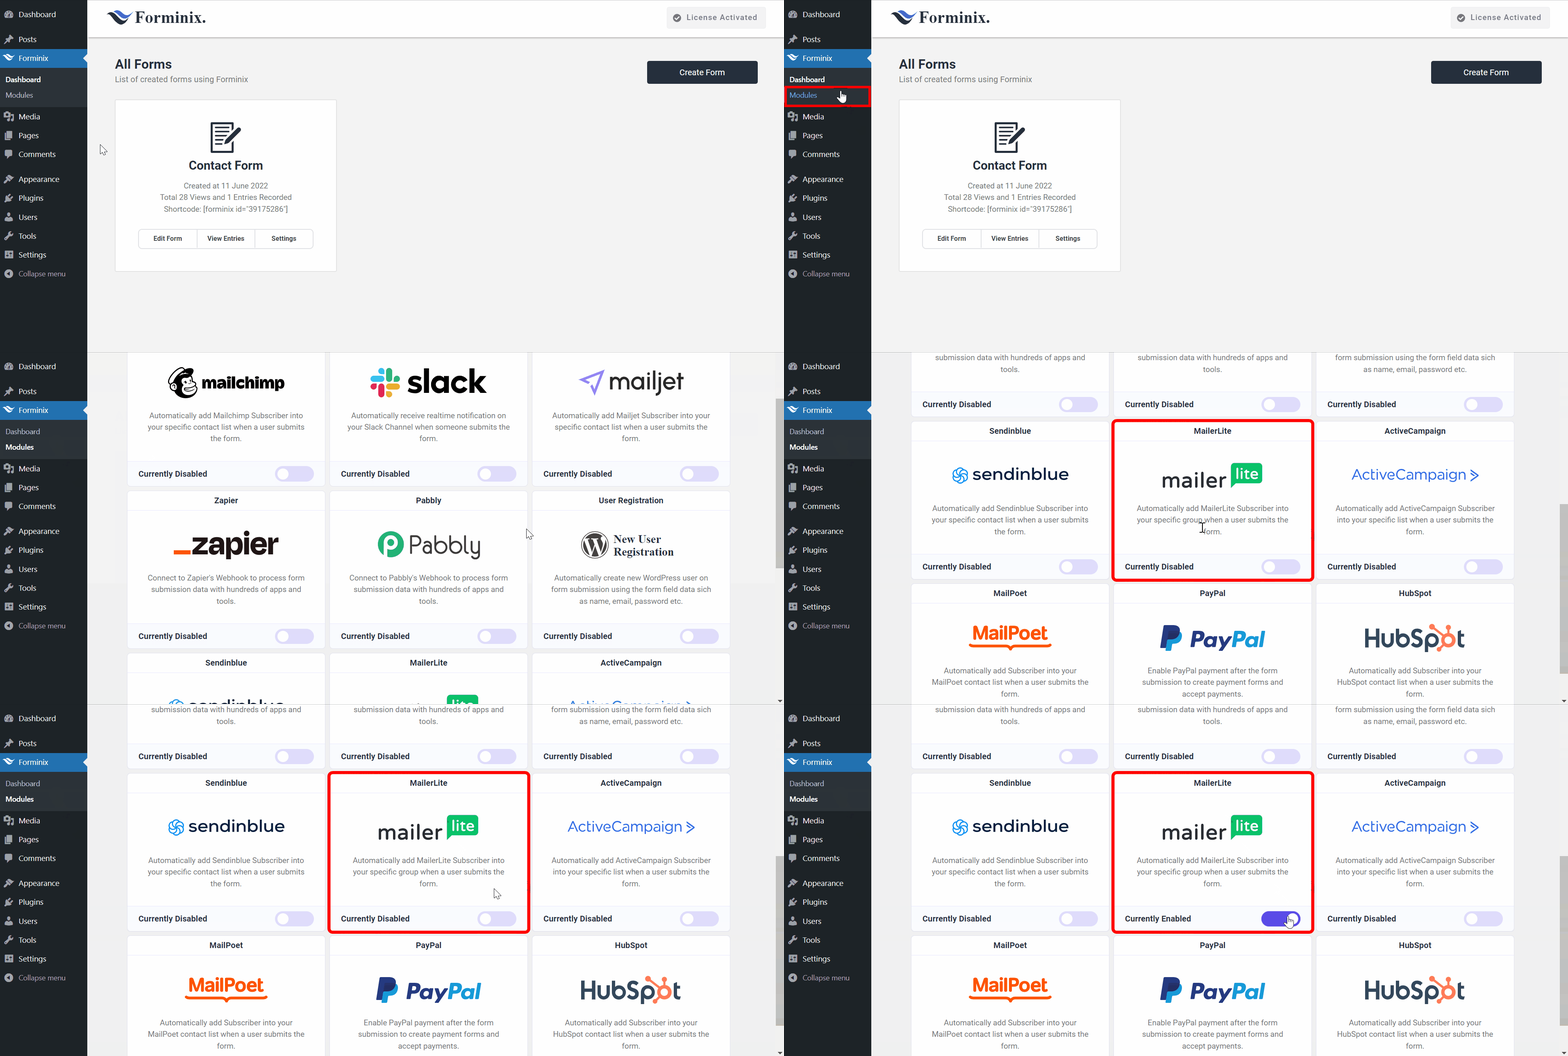
On your WordPress admin panel, navigate to the “Modules” menu of the Forminix plugin. Then find and enable the MailerLite integration toggle as shown below.
Step 2: Add Integration in Form Settings
Now, go to your form’s settings page and navigate to the “Integrations” tab on the top right hand.
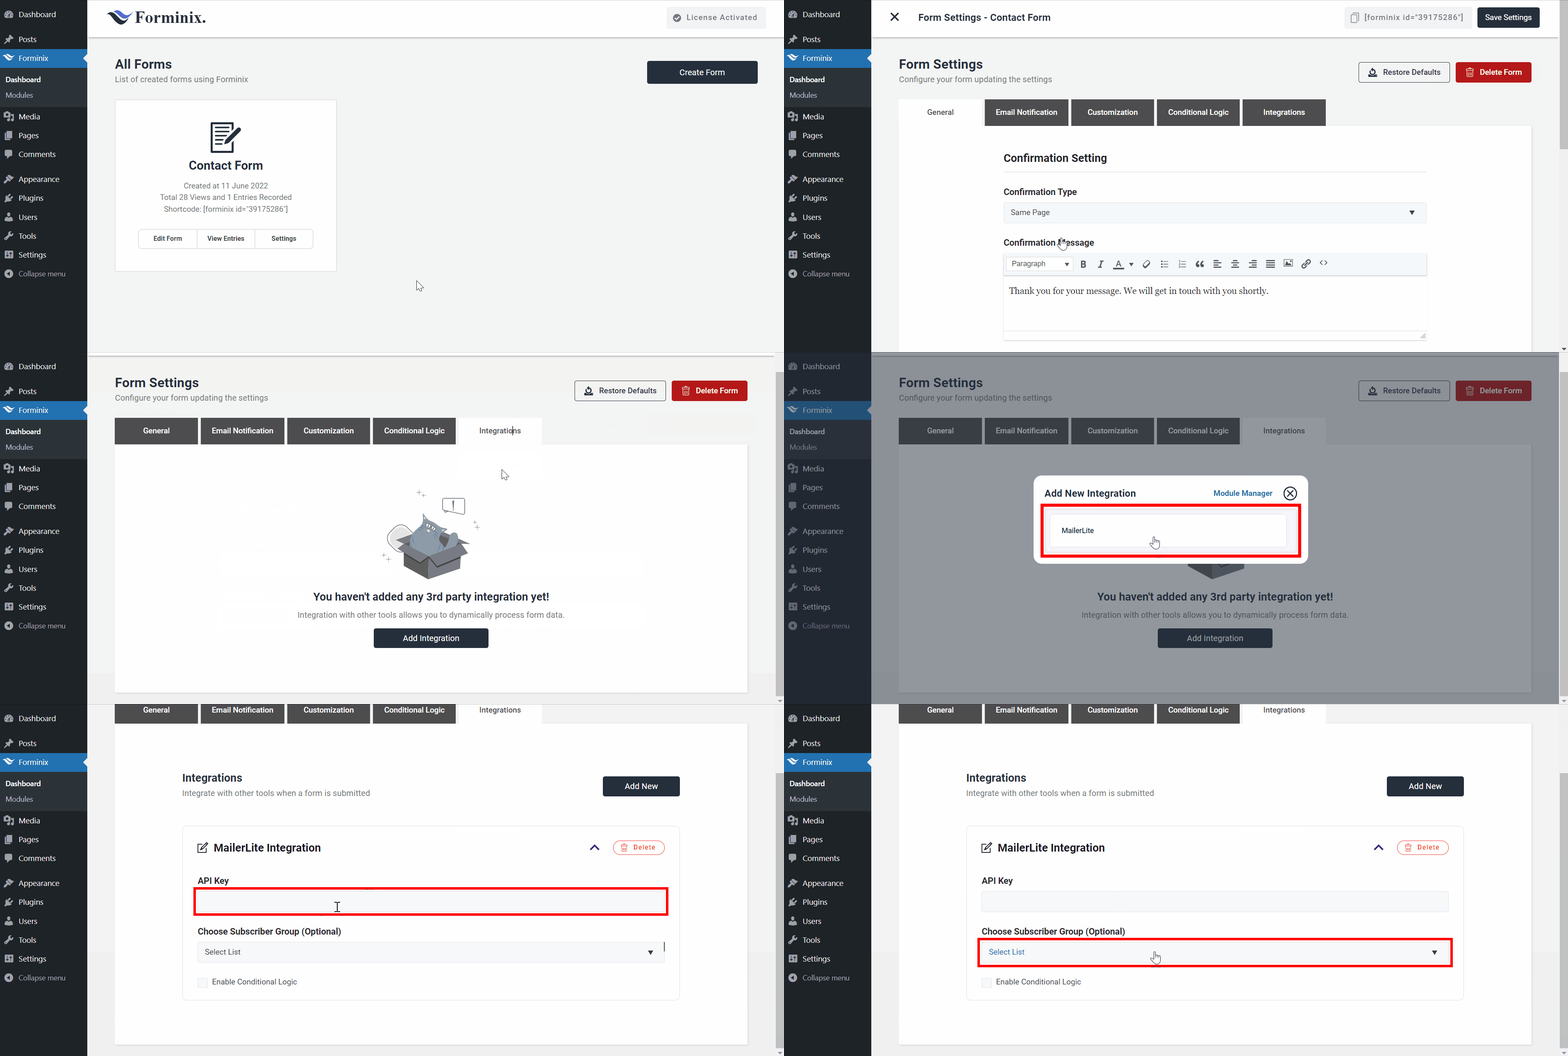
On that page, you will see the “Add Integration” button at the bottom of the page. Click on it and a popup will appear. From there, select the newly enabled “MailerLite” integration.
Step 3: Add MailerLite API Key and Subscriber Group
In the “MailerLite Integration” panel you will see two fields. They are the “API Key” field and the “Subscriber Group” field. Let’s take a look them and fill them up.
API Key:
Here, you must provide the MailerLite API Key to be able to send users from your WordPress to MailerLite subscriber group.
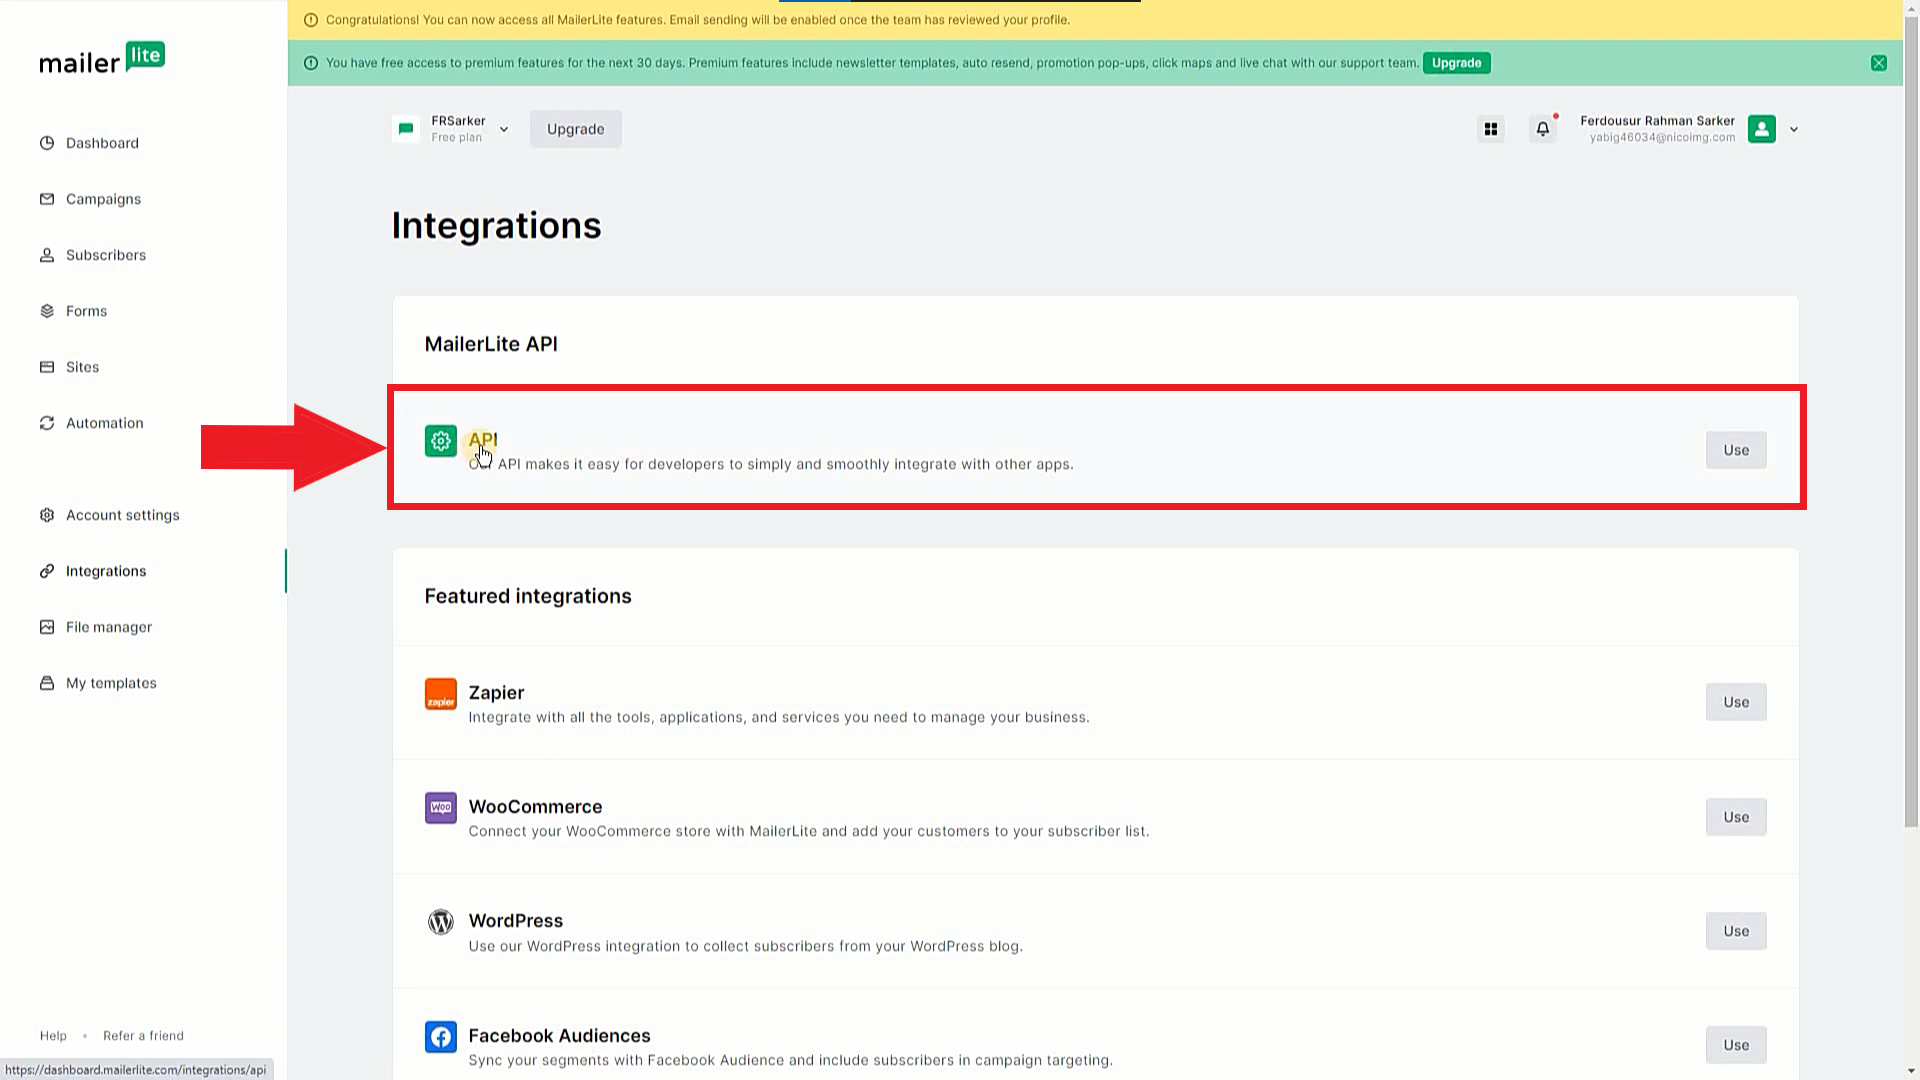
To get the API Key, navigate to the “Integrations” option on the left-hand side of your MailerLite dashboard.
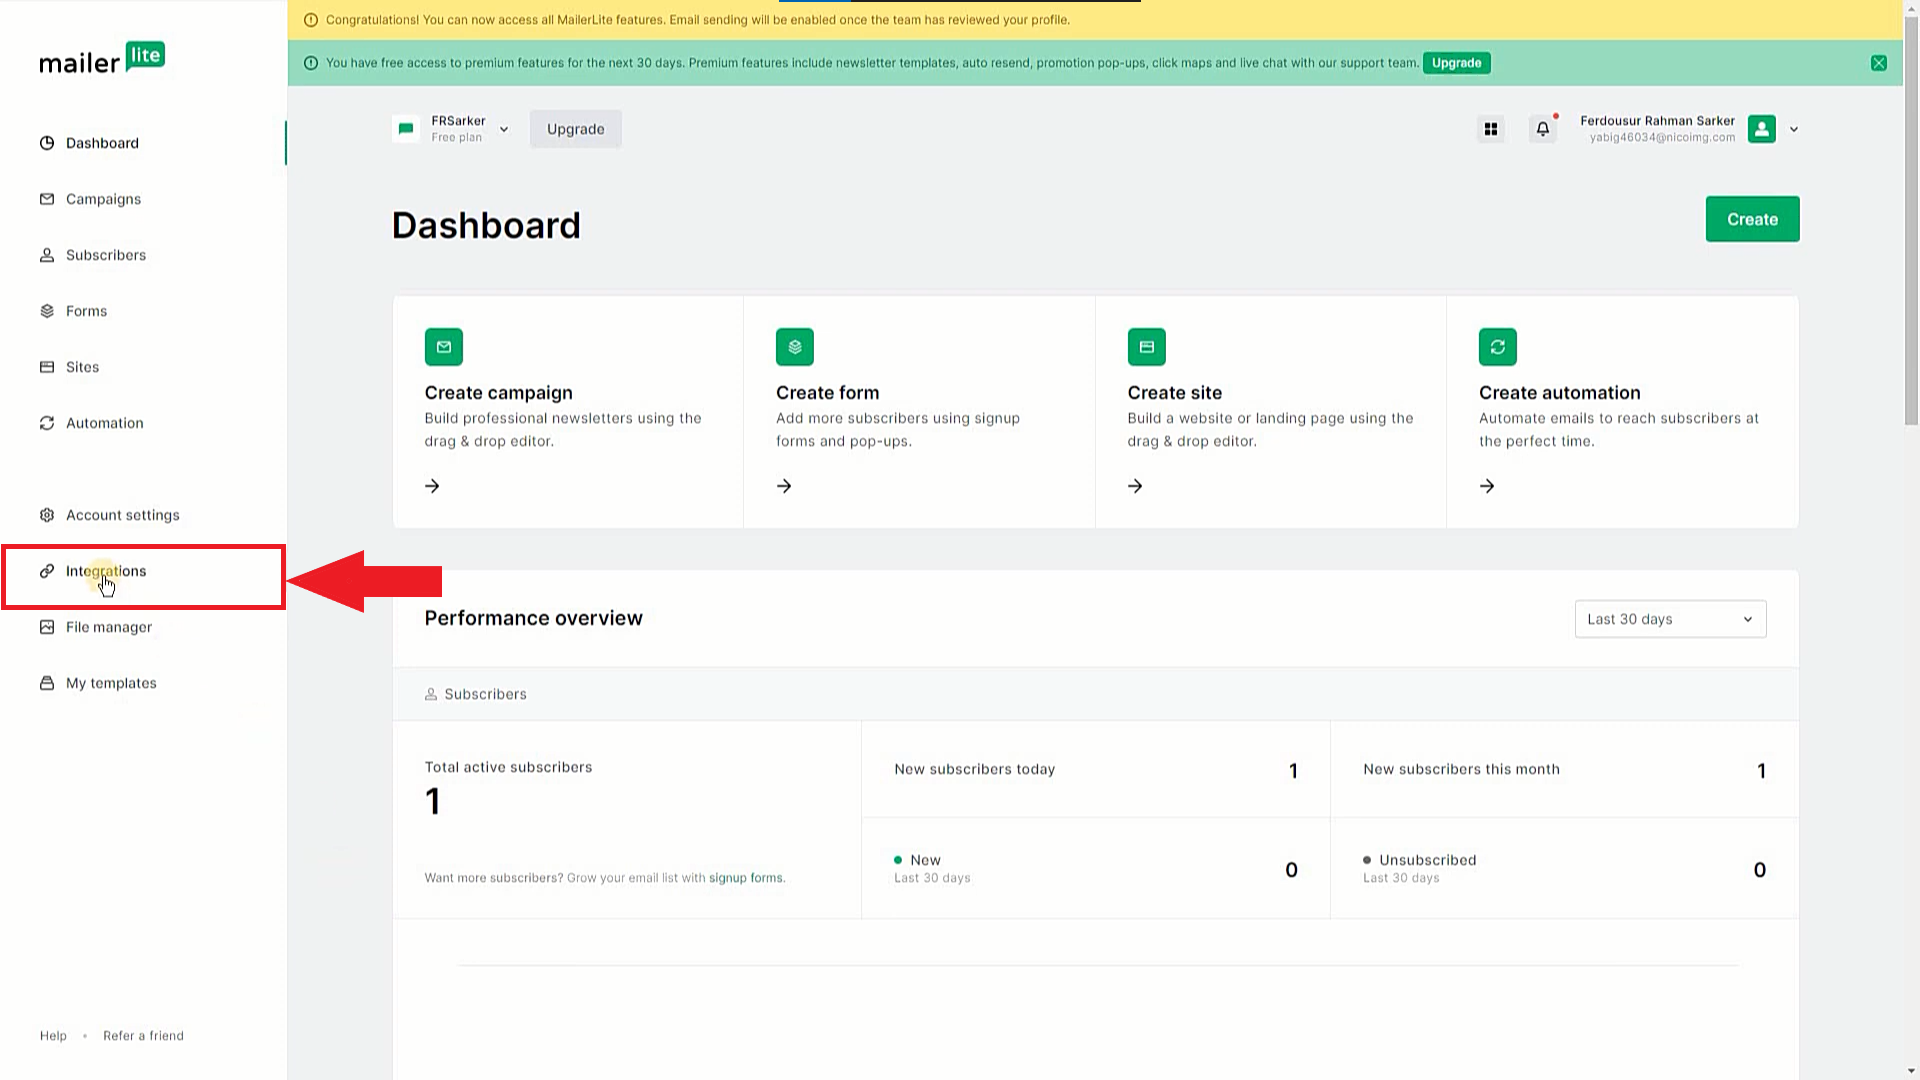
Then on the next page, click on the API option under “MailerLite API” (as shown below).
It will take you to the “Developer API” page/section where you can create your API token. Simply click on the “Generate new token” button and a popup will appear.
Then, enter your token name (anything you want) and hit the “Create token” button.
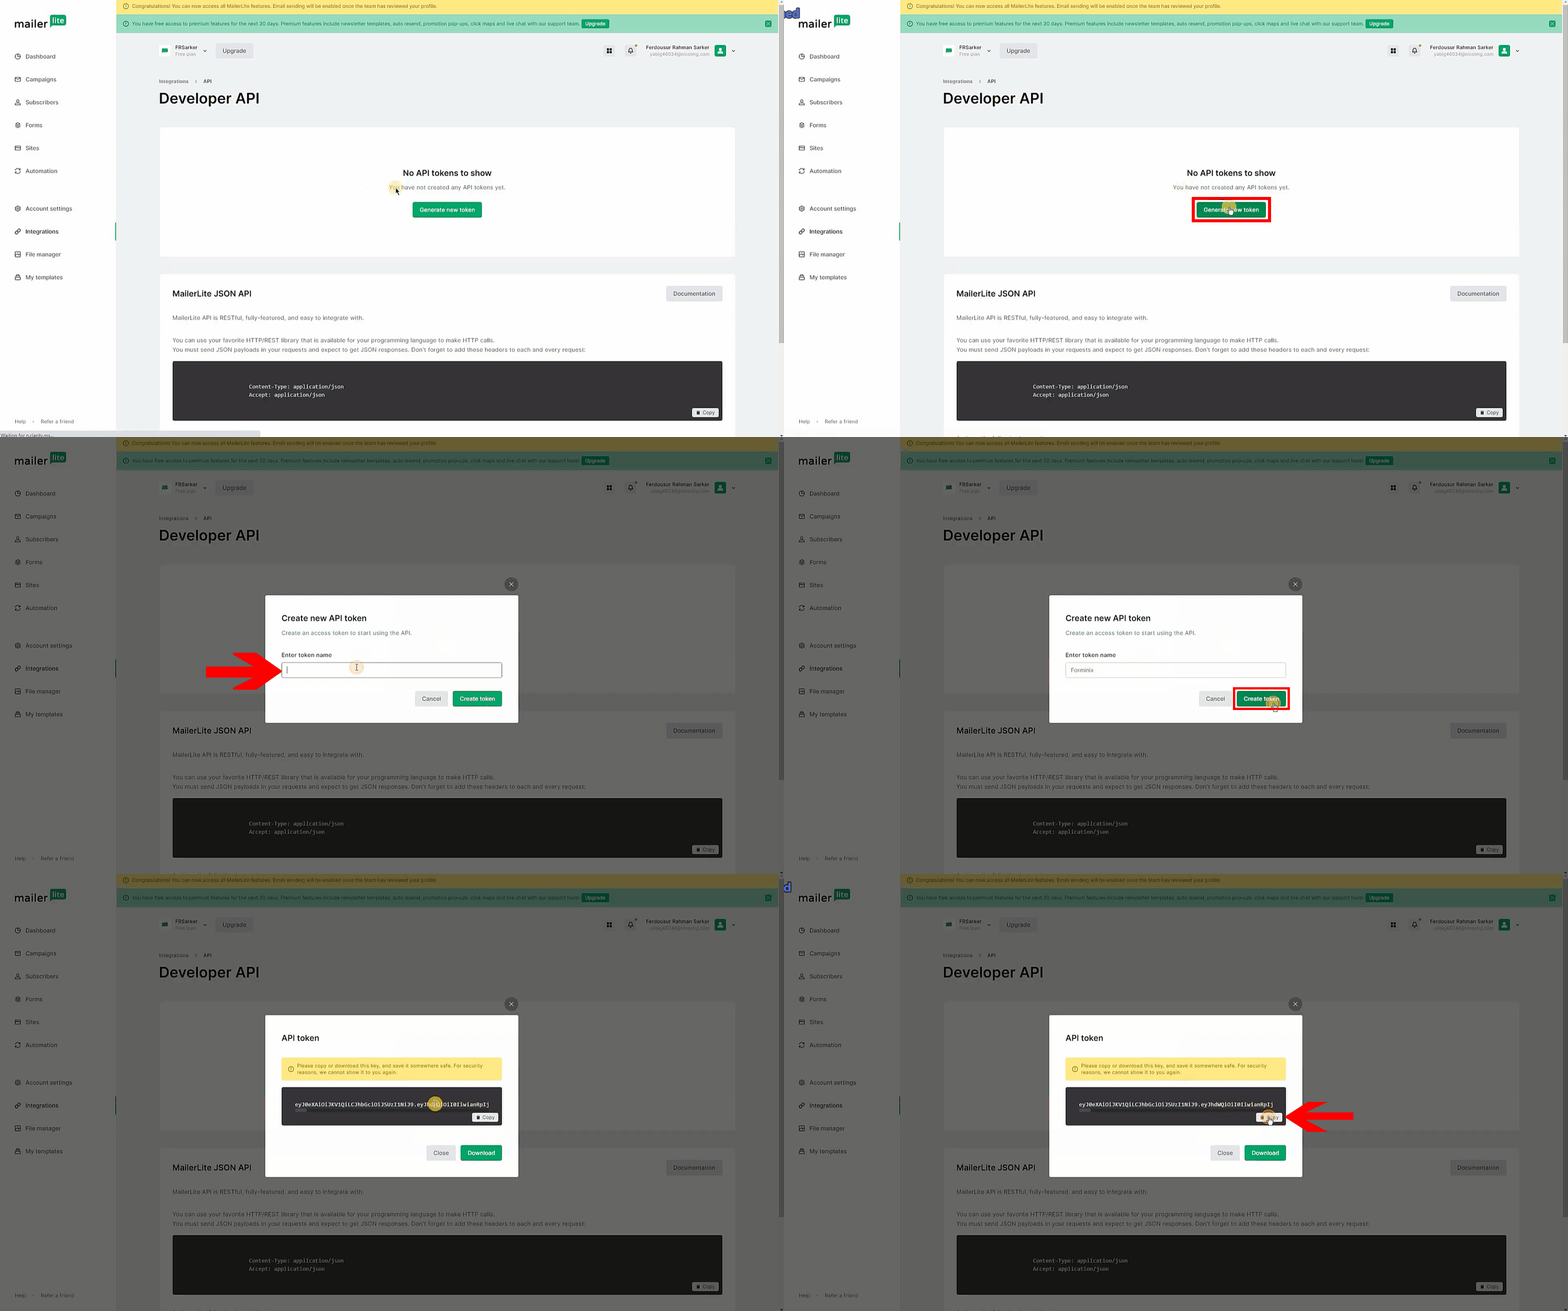
That’s it, your token is instantly created. Click the “copy” button in the popup and your API key will be copied. Then, simply paste it in the API Key field in Forminix (as shown below).
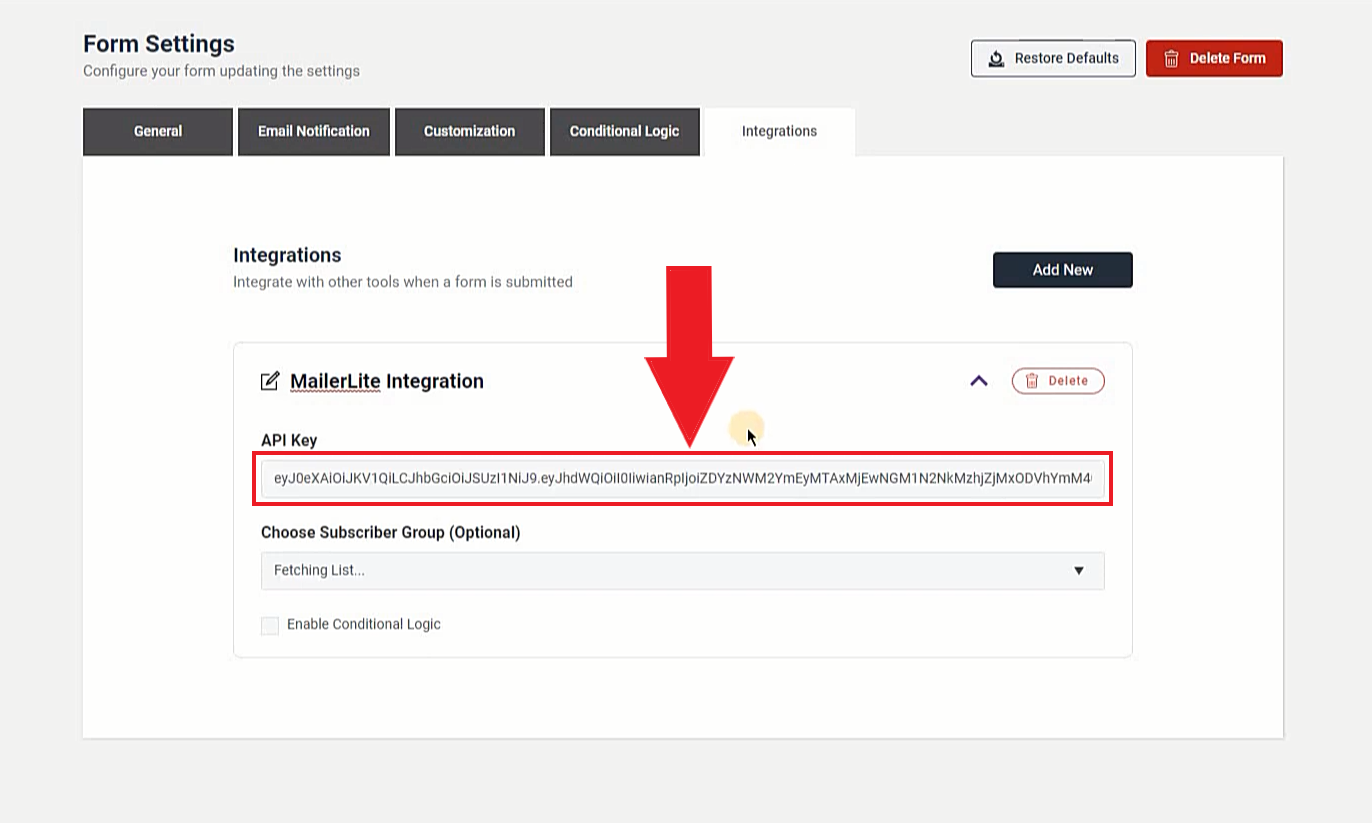
NOTE: You can enable the conditional logic option at the bottom of the panel if you want to use it.
Choose Subscriber Group:
You can select a subscriber group of your MailerLite account where your users/subscribers will be added. Right after providing the MailerLite API Key, Forminix will fetch the subscriber groups from your MailerLite account immediately.
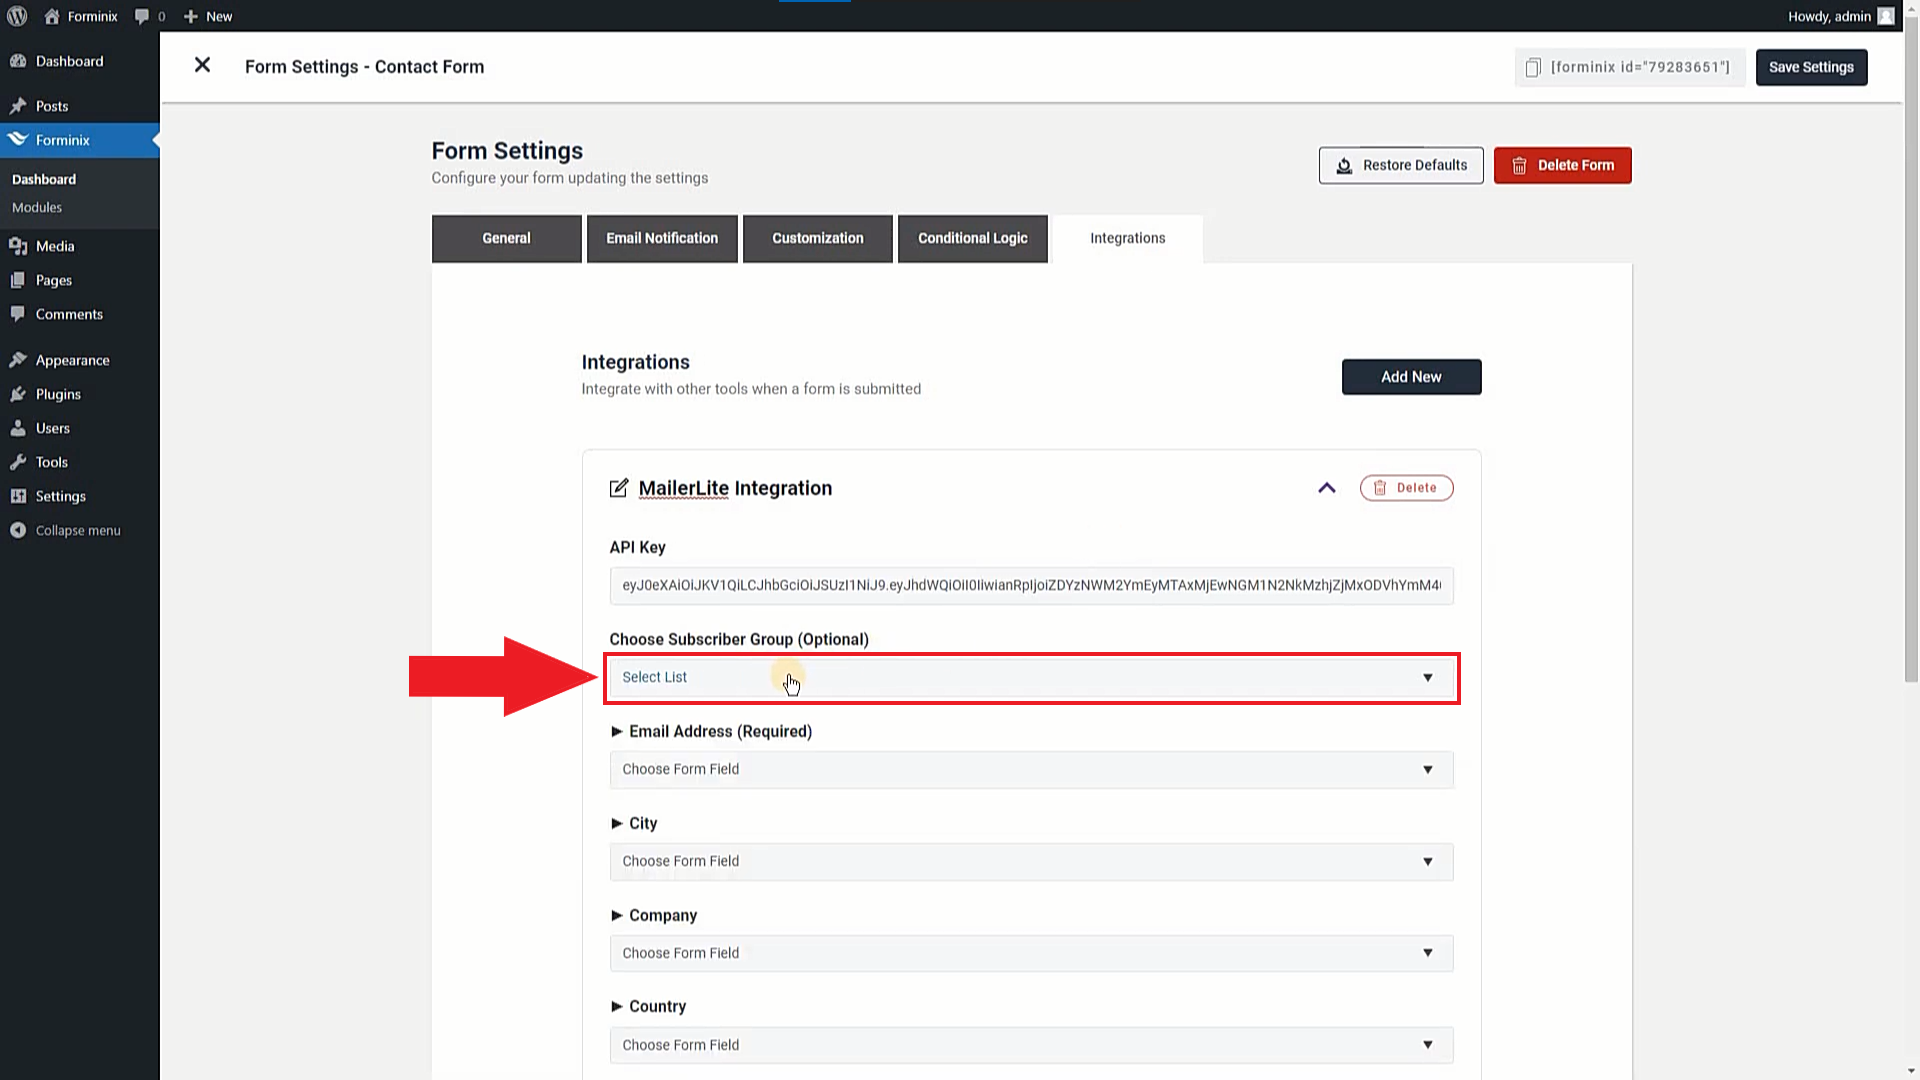
So, click on this field and choose your desired subscriber list from the dropdown menu to connect your MailerLite with WordPress form.
Step 4: Map the Form Fields for MailerLite User Profile Info
We are almost done! At this stage of our configuration, we have to map our form fields.
Because the mapped fields will be used as profile information of the users/subscribers whom we will be adding from our WordPress to MailerLite subscriber group.
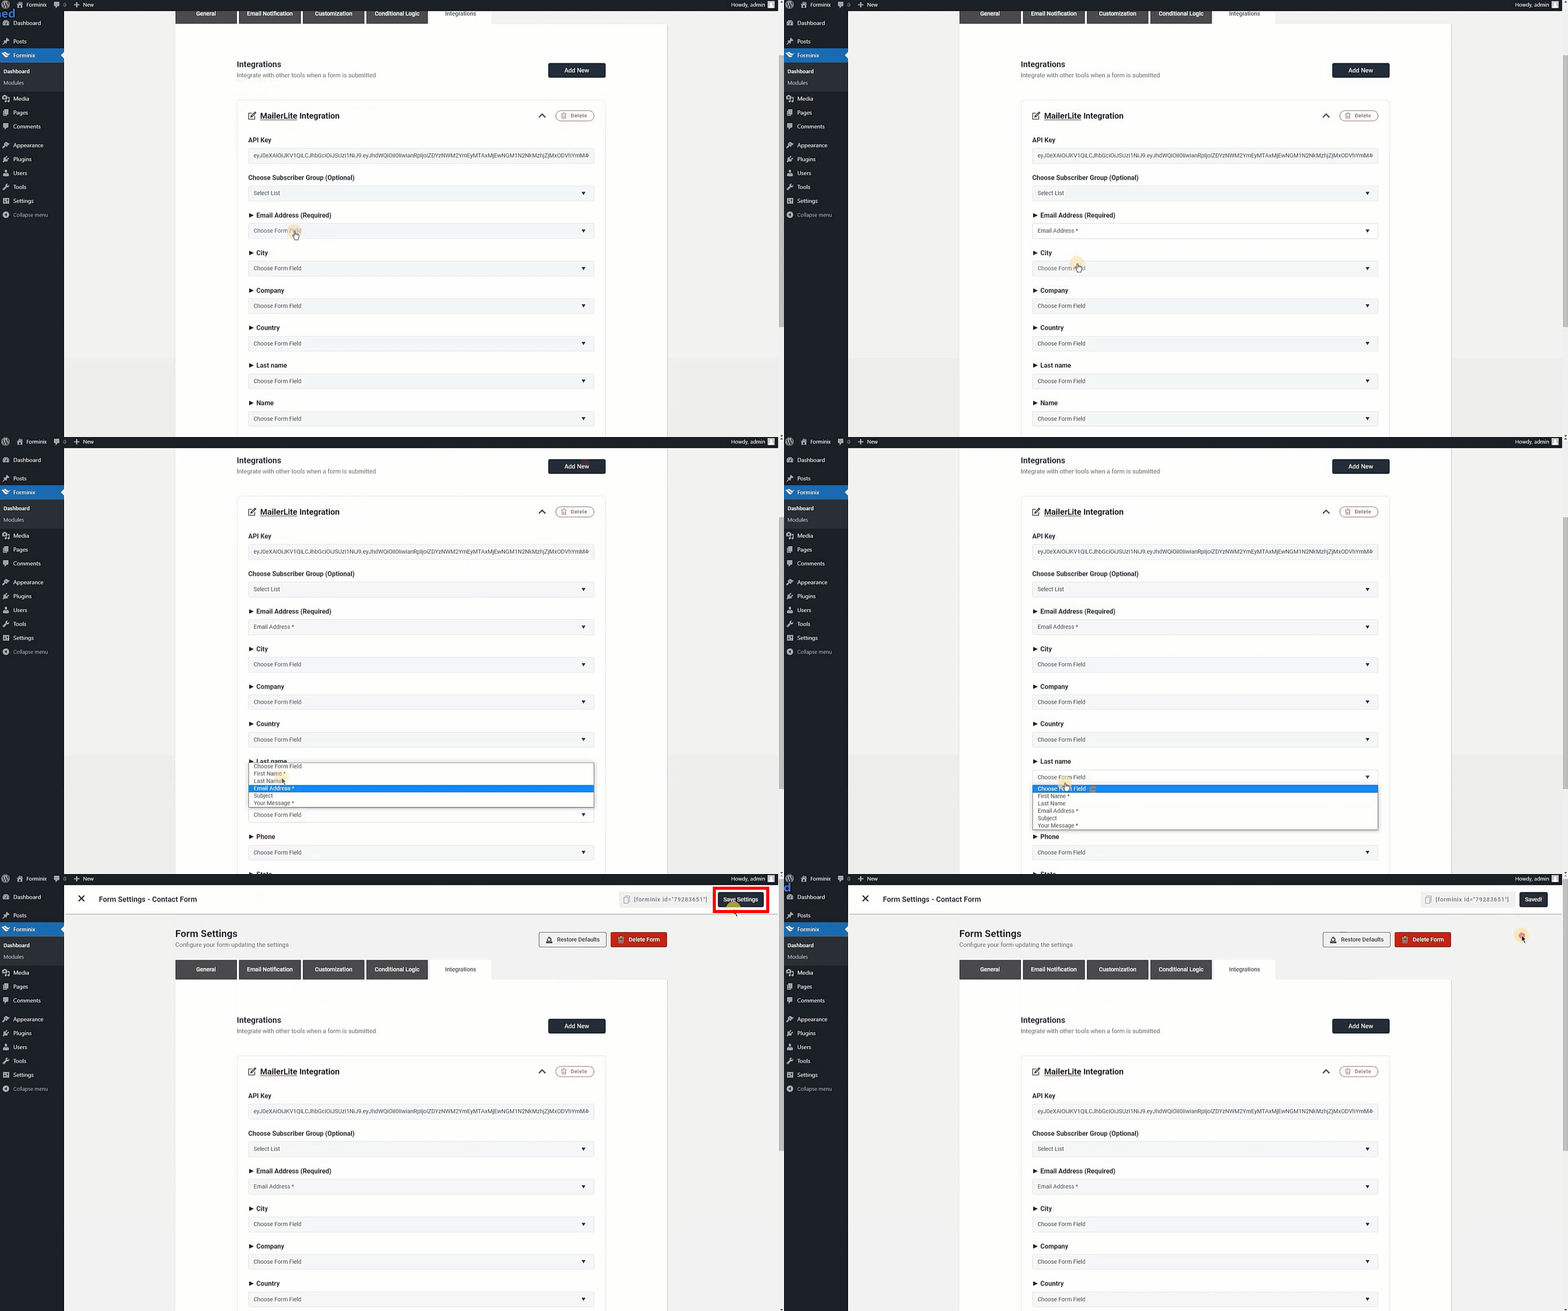
For this tutorial we have chosen the “Email Address” field as the MailerLite subscriber’s email address, “First Name” field as their first name and “Last Name” field as their last name.
Step 5: Save All Settings and Test WordPress MailerLite Integration
Finally, after completing all the previous steps properly, we have to save our setting by clicking on the “Save Settings” button on the top right corner of Forminix plugin page.
So, let’s now start testing our WordPress MailerLite integration and see how everything runs.
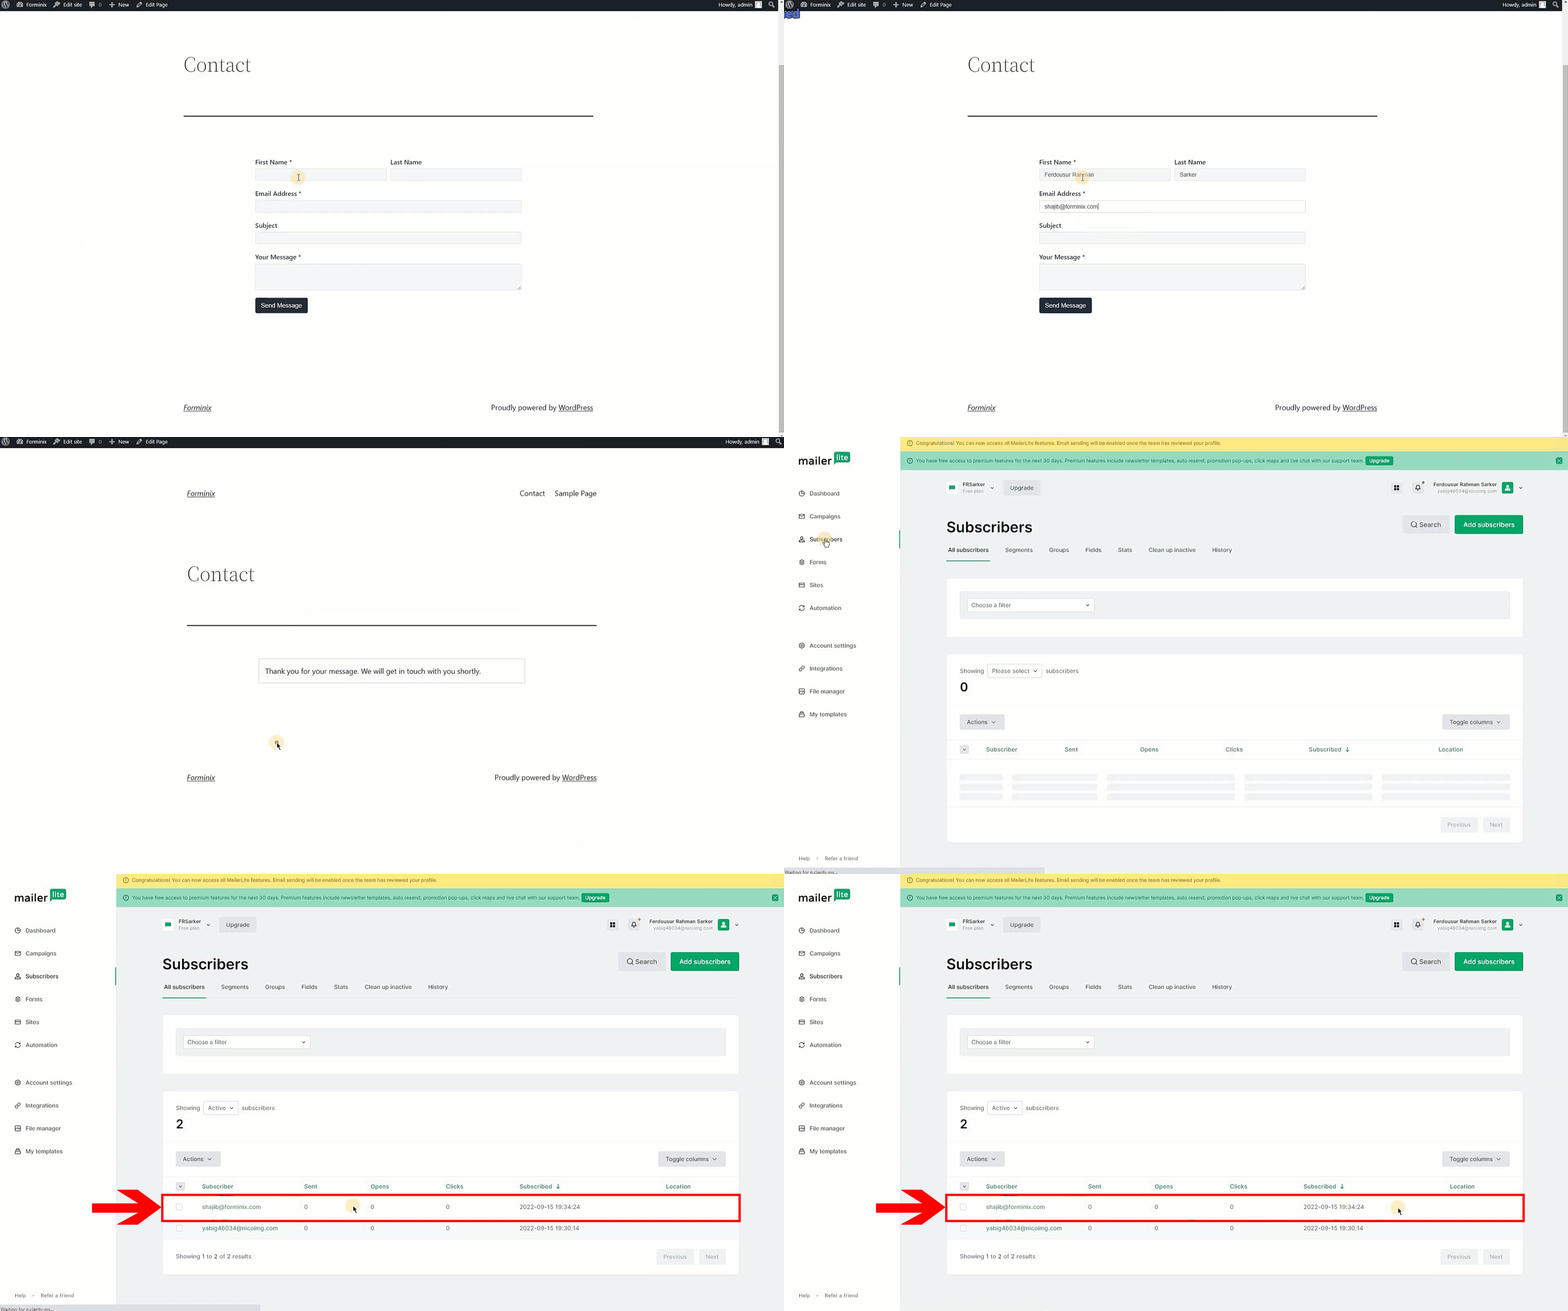
Great! Our WordPress MeilerLite integration is working smoothly as expected.
Now, to see the list of your subscribers, simply navigate to the “Subscribers” option at left-hand side panel of your MailerLite dashboard. Then, On the next page you will see all your subscribers, listed with all the mapped form field info as shown above.
And, if you detect any issue, go through and recheck all the previous steps to fix the mistakes (if found any).
So, now you know how to connect your MailerLite with WordPress form in Forminix.
Conclusion
In this step-by-step tutorial we have shown you how you can easily connect your MailerLite with WordPress form in 5 simple steps. And it will take you no more than a minute or two to complete your setup.
We hope that you can now successfully setup the WordPress MailerLite integration with your Forminix plugin. Add your subscribers from your WordPress to MailerLite subscriber groups in no time!
No more searching and wasting time looking for expensive email service providers! As Fominix Form Builder brings you the easiest way to connect your MailerLite with WordPress form(s) within clicks.
So, what are you waiting for? Give your startup business the boost it needs today with MailerLite’s fast and smooth digital marketing automation tools and Forminix.
Last but not the least, please leave your precious comments and suggestions down below. If you have any queries, post them as well.
Until next time, Take Care.


