Are you an ActiveCampaign user? Want to easily connect your ActiveCampaign with WordPress forms on your site? We have got your back!
In this article we will discuss and show you how you can add subscribers from your WordPress to ActiveCampaign contact list with Forminix Form Builder.
Continue reading further for details.
ActiveCampaign: A Smart Customer Experience Automation Service
When you want to extend connection with your customers, beyond making sales, ActiveCampaign is a smart choice for you in the market.
It not only does enable you to automate your marketing strategies but also makes you stay in touch with the overall customer lifecycle.
Make your customers feel very important, gain more trust, support and user satisfaction.
To mention some of its top features, we have,
- CRM automation for managing contacts, leads, making sales smoother.
- 870+ integrations of popular business apps such as Shopify, WooCommerce etc.
- Custom landing page builder for capturing more leads.
- Advanced marketing and sales reporting tools.
And to make your experience even greater, Forminix form builder has brought their latest feature update that allows you to connect your ActiveCampaign with WordPress forms within clicks.
More about it, in short.
The WordPress ActiveCampaign Integration: By Forminix
Forminix Form Builder has brought another new modular update to their collection, the WordPress ActiveCampaign integration.
This new feature allows you to connect your ActiveCampaign with WordPress form(s) in quick simple steps, making your email marketing process smarter and more efficient.
So, if you have your ActiveCamaign service up and ready, you can now take advantage of adding users directly from your WordPress to ActiveCampaign contact list through form submissions.
In this tutorial we will take you through all the steps needed for setting up your integration.
So, without any further due, let’s get down to business.
NOTE: Before we get started it is recommended that you update your existing Forminix plugin to the latest version. However, if you dont have the plugin installed yet, you can
check out the pricing plans from here and download.
A Step-by-step Guide to Connect ActiveCampaign with WordPress Form in Forminix
Before we begin with the instructions, a quick mention for you. If you do not have ActiveCampaign account or service up and running, we recommend opening up your account from here. On the other hand, you can check out their 14-day trial period before purchasing any package. Now, with that out of the way, let’s continue.
For sake of this tutorial, we have made a simple custom contact form.
With this form we will be collecting different user inputs and send them from our WordPress to ActiveCampaign contact list with each form submission.
The collected form field inputs will be used as the subscriber profile information in our ActiveCampaign contact list.
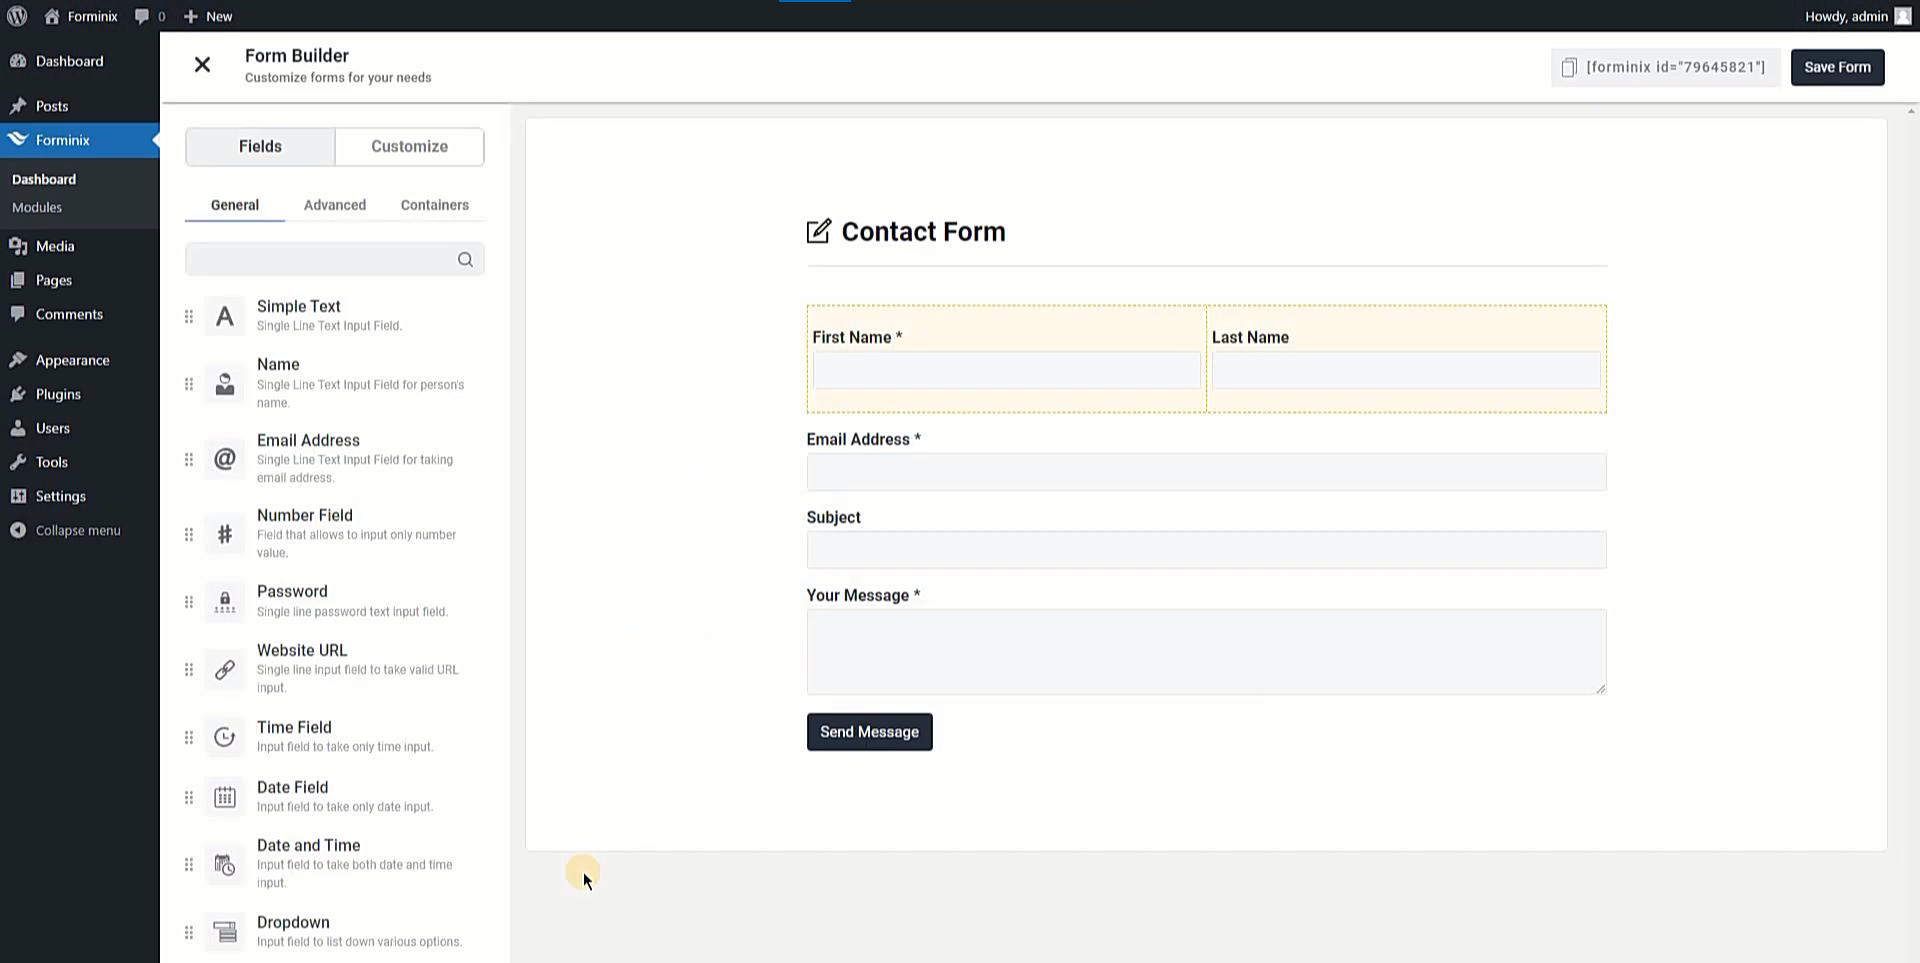
Any type of form can be used depending on your needs. Besides you can collect any amount of form field information to make the subscriber profile in the contact list.
Step 1: Enabling the WordPress ActiveCampaign Integration
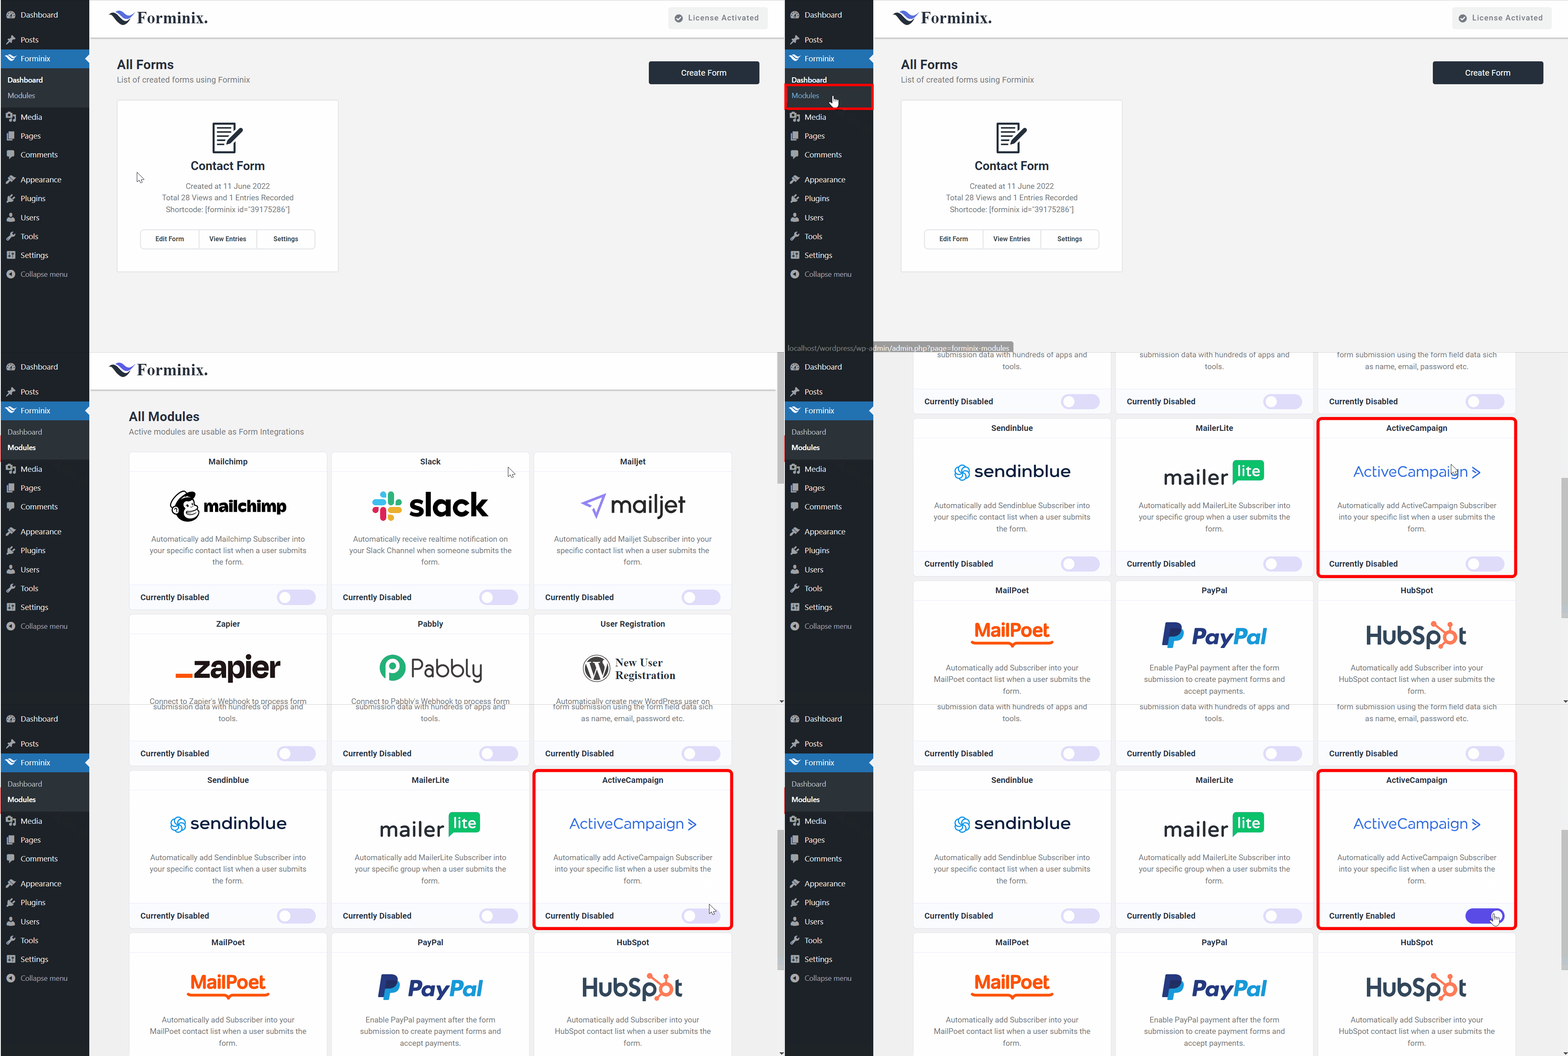
From your WordPress admin panel, go to the “Modules” menu of the Forminix plugin. Then look for the ActiveCampaign integration toggle and enable it (as shown below).
Step 2: Adding Integration in Form Settings
Now, navigate to your form’s settings page and go to the “Integrations” tab on the top right side.
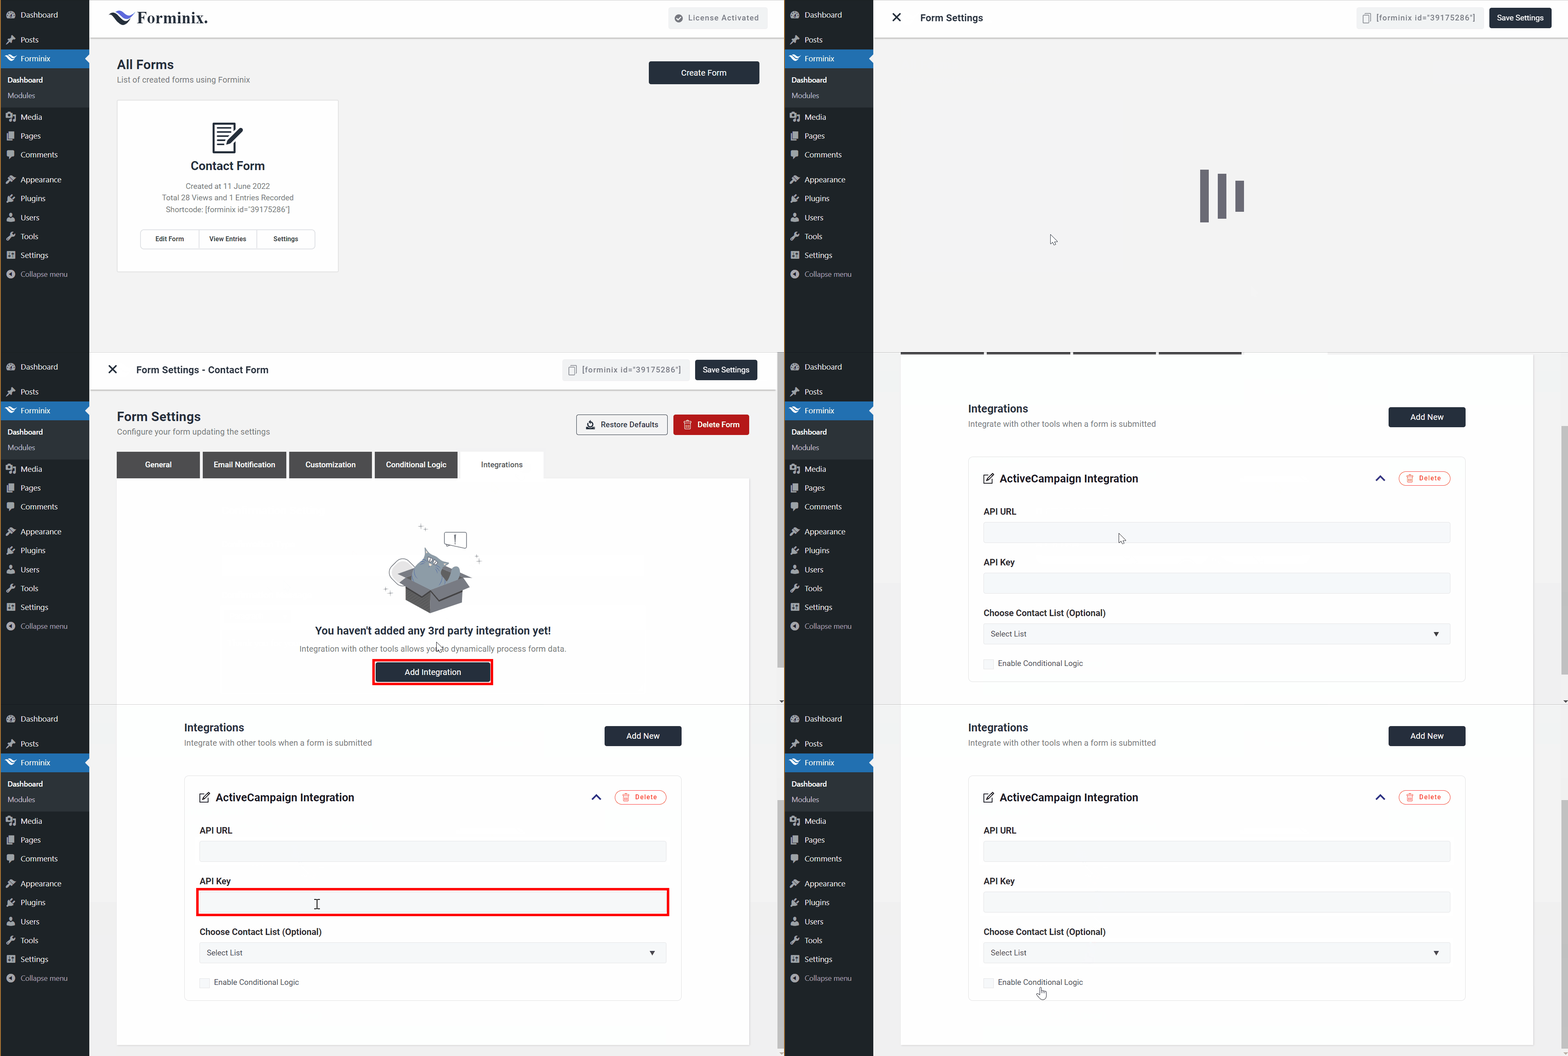
On the next page you will see the “Add Integration” button at the bottom. Click on it and a popup will appear. From there, select the newly enabled “ActiveCampaign” integration.
Step 3: Adding ActiveCampaign API URL, API Key and Contact List
In the “ActiveCampaign Integration” panel there will be three fields. They are the “API URL” field, “API Key” field and the “Choose Contact List” field.
Let’s take a look at these and fill them up.
API URL and API Key:
The API URL and API Key are prerequisite for the you to be able to send your subscribers form your WordPress to ActiveCampaign contact list. Therefore, you cannot setup your connection without these.
Now, to get the URL and the Key, simply go to your ActiveCampaign dashboard and click on the “Settings” option at the bottom left corner.
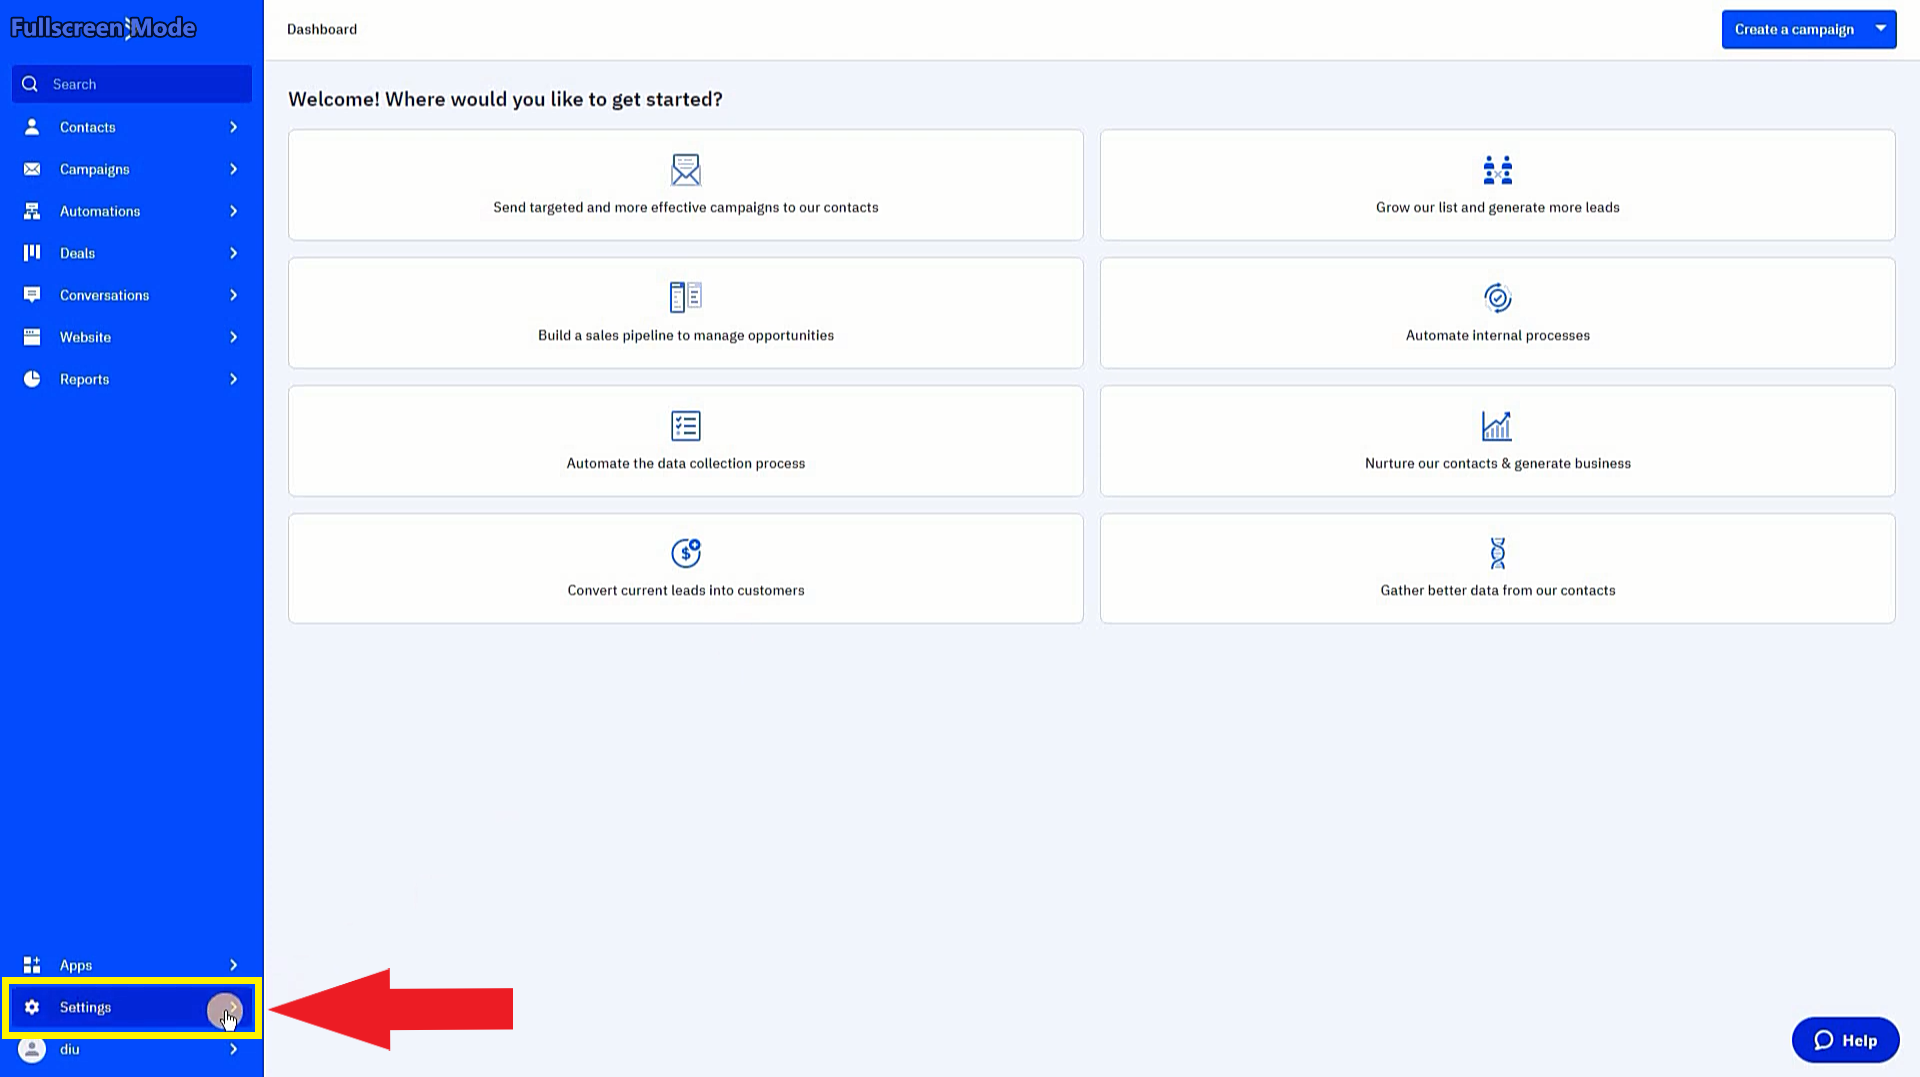
Then on the next page, click the “Developer” option from the sidebar on the left (as shown below).
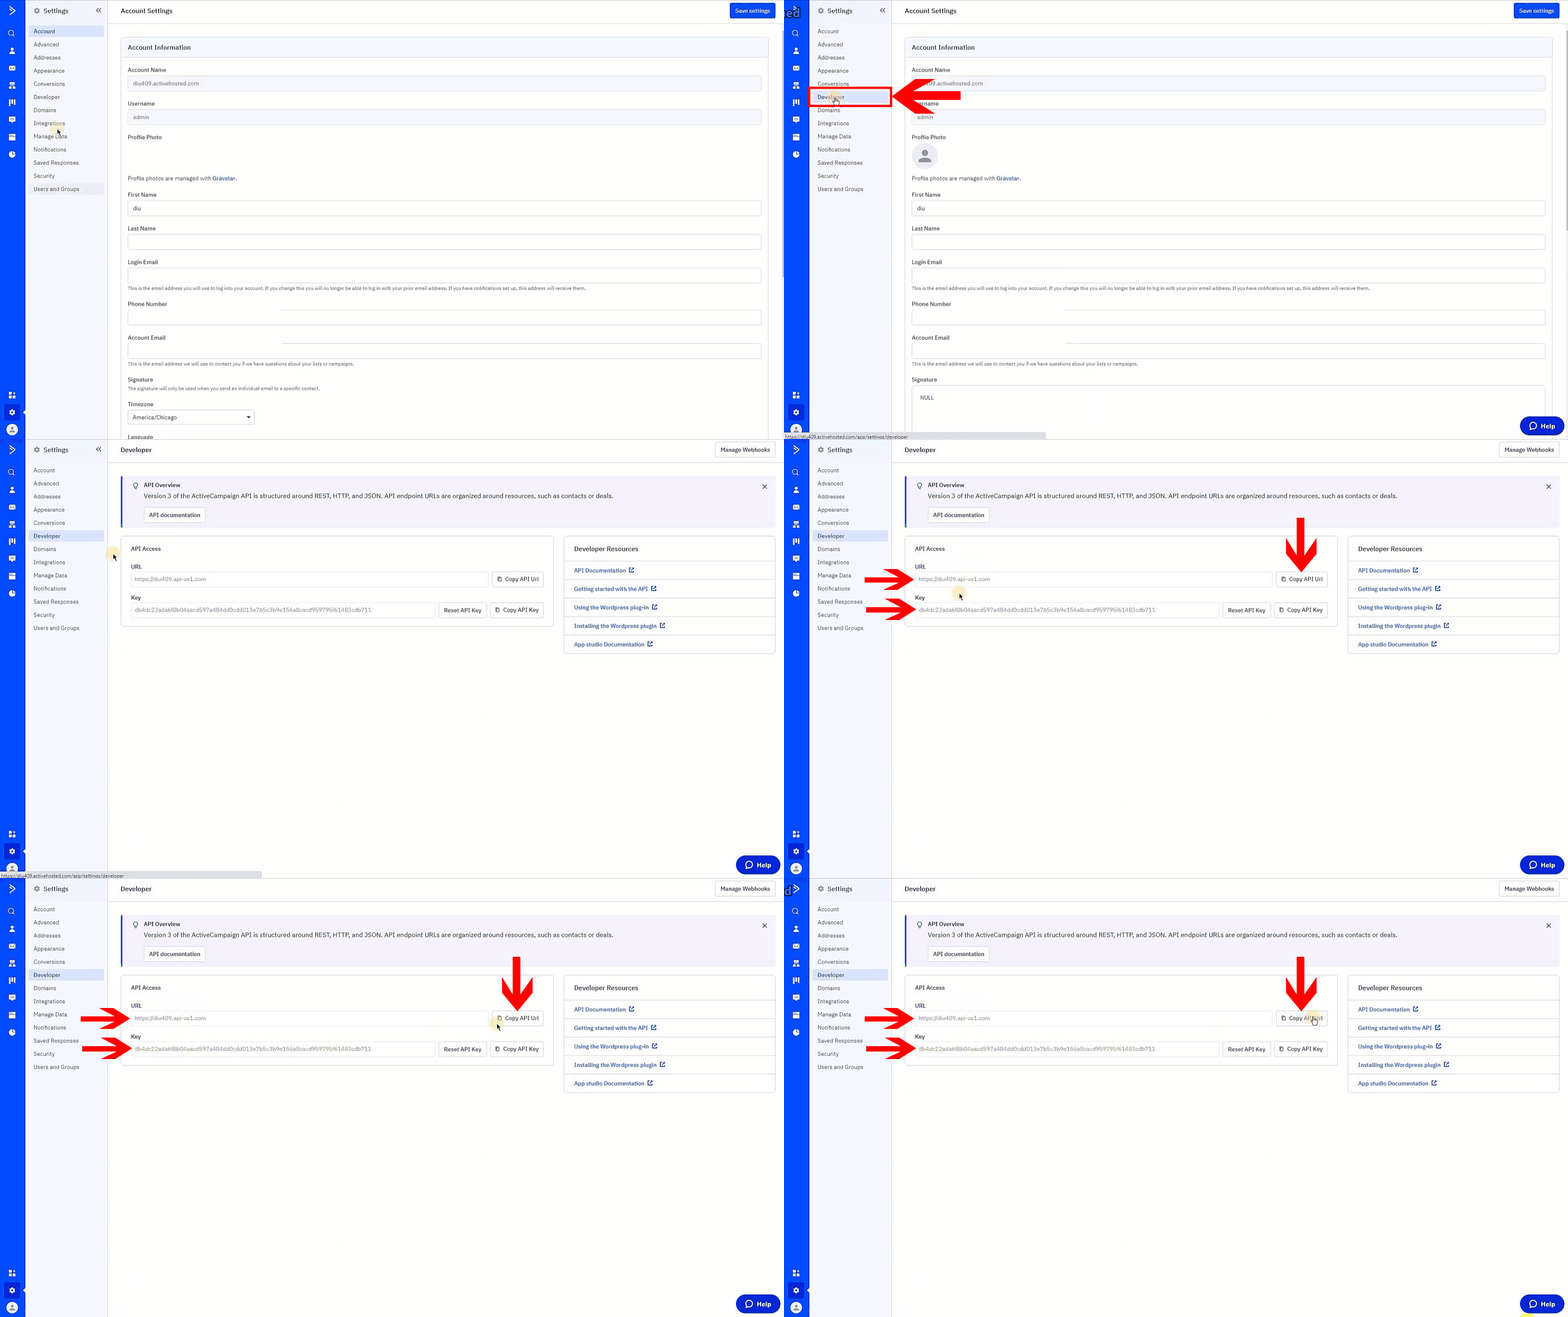
Here you will see your ActiveCampaign API URL and API Key. You can also reset your API Key if you need. Now, copy the API URL and API Key and place them in the integration settings in Forminix (as shown below).
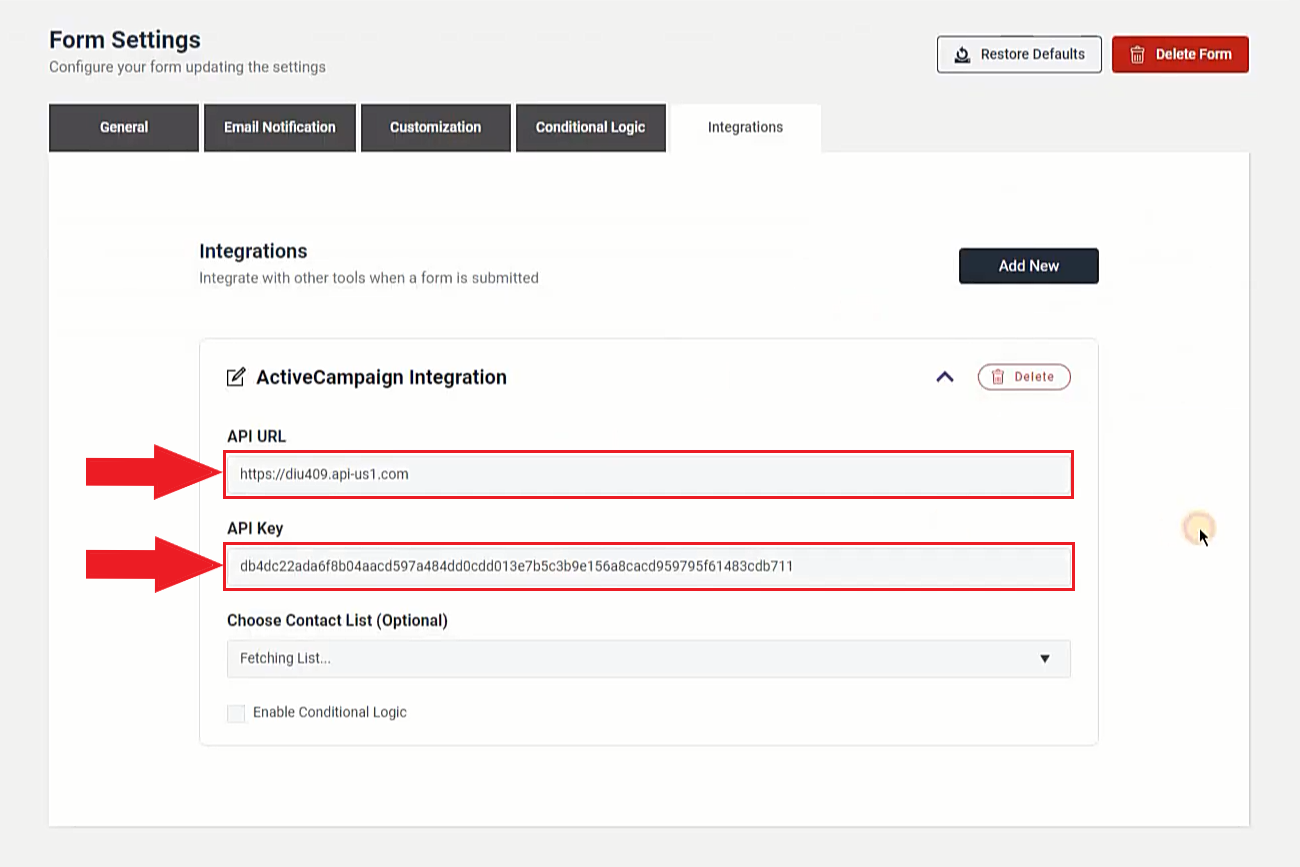
NOTE: You can enable the conditional logic option at the bottom of the panel if you want to use it.
Choose Contact List:
If you want to add subscribers from your WordPress to ActiveCampaign contact list, then you can select your preferred one from this section.
After providing the API URL and API Key, Forminix will fetch the contact lists from your ActiveCampaign account in an instant.
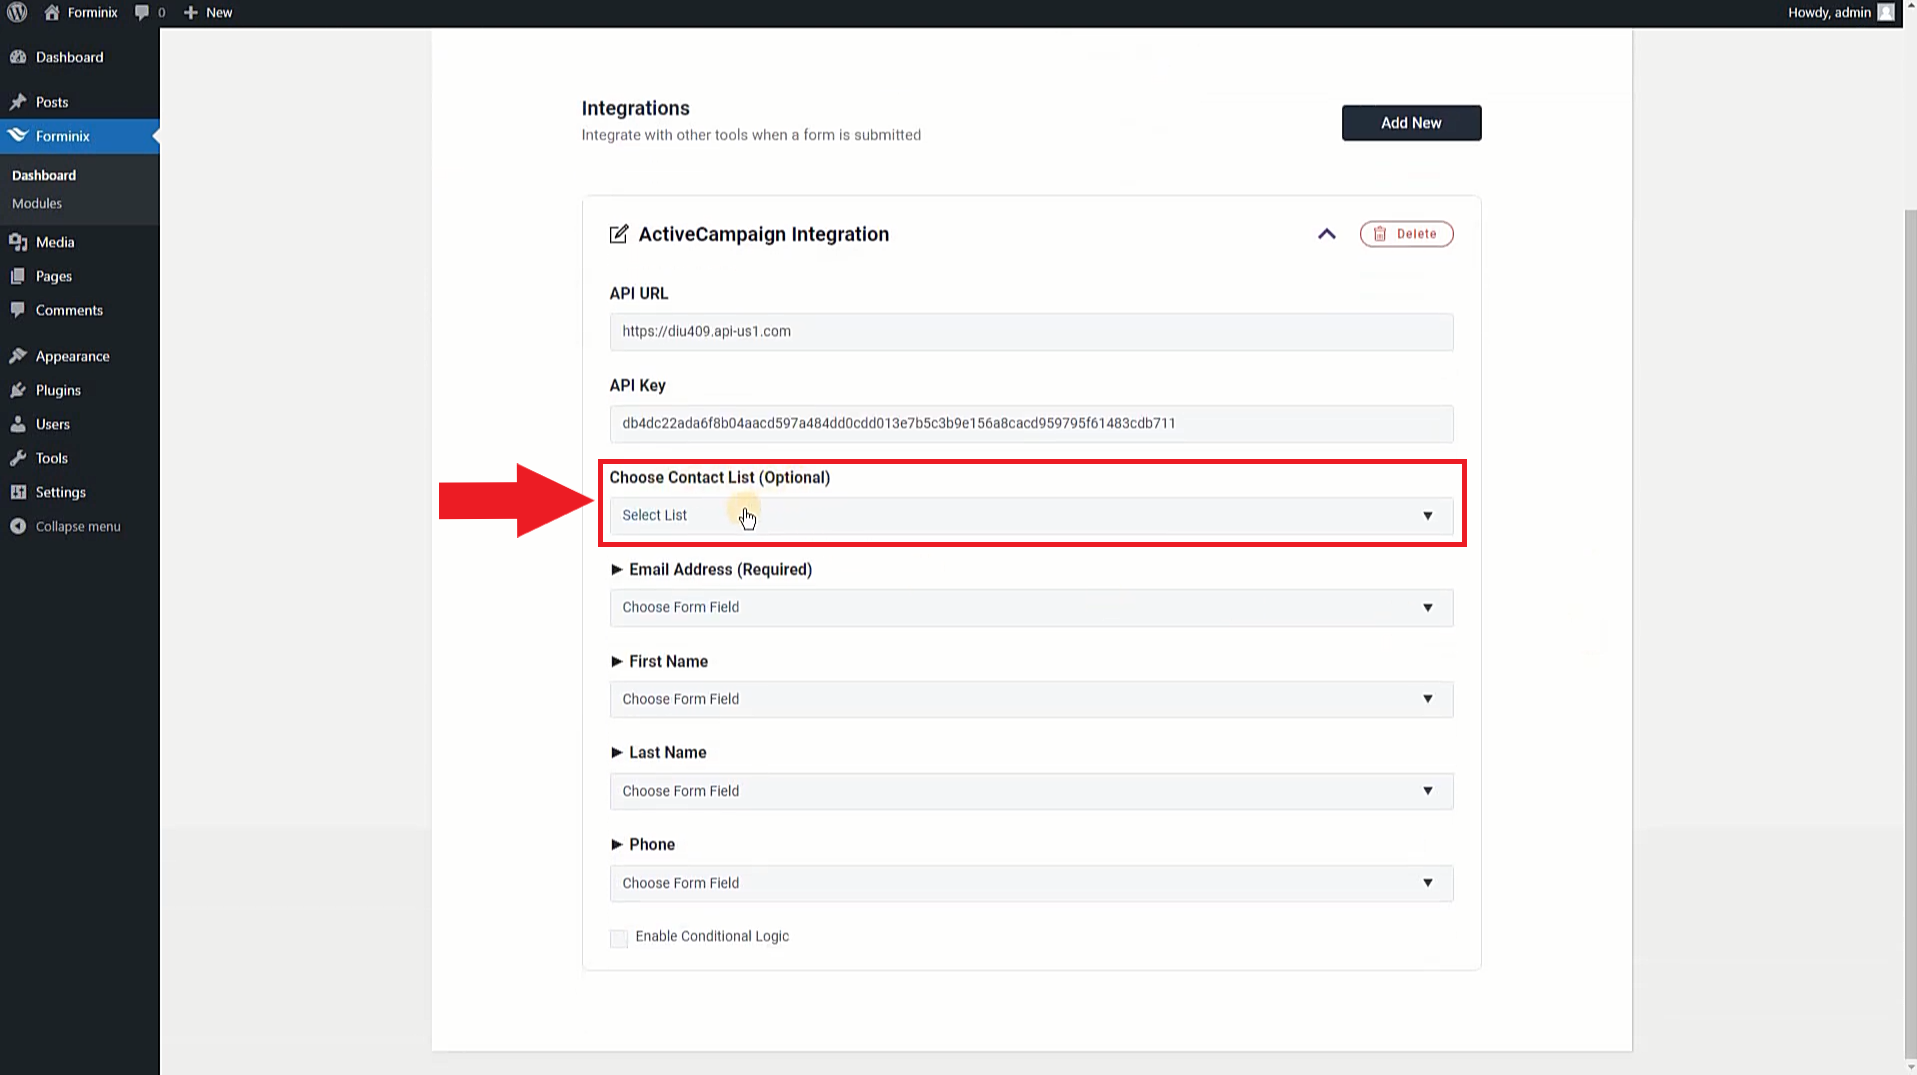
So, click on this field and choose a contact list from the dropdown menu to connect your ActiveCampaign with WordPress form.
Step 4: Mapping the Form Fields for ActiveCampaign User Profile Info
Our setup is almost done! After finishing up all the previous steps, we now have to do one more important thing, mapping the form fields.
Because the mapped form fields are going to be the profile information of users/ subscribers who will be added from our WordPress to ActiveCampaign contact list.
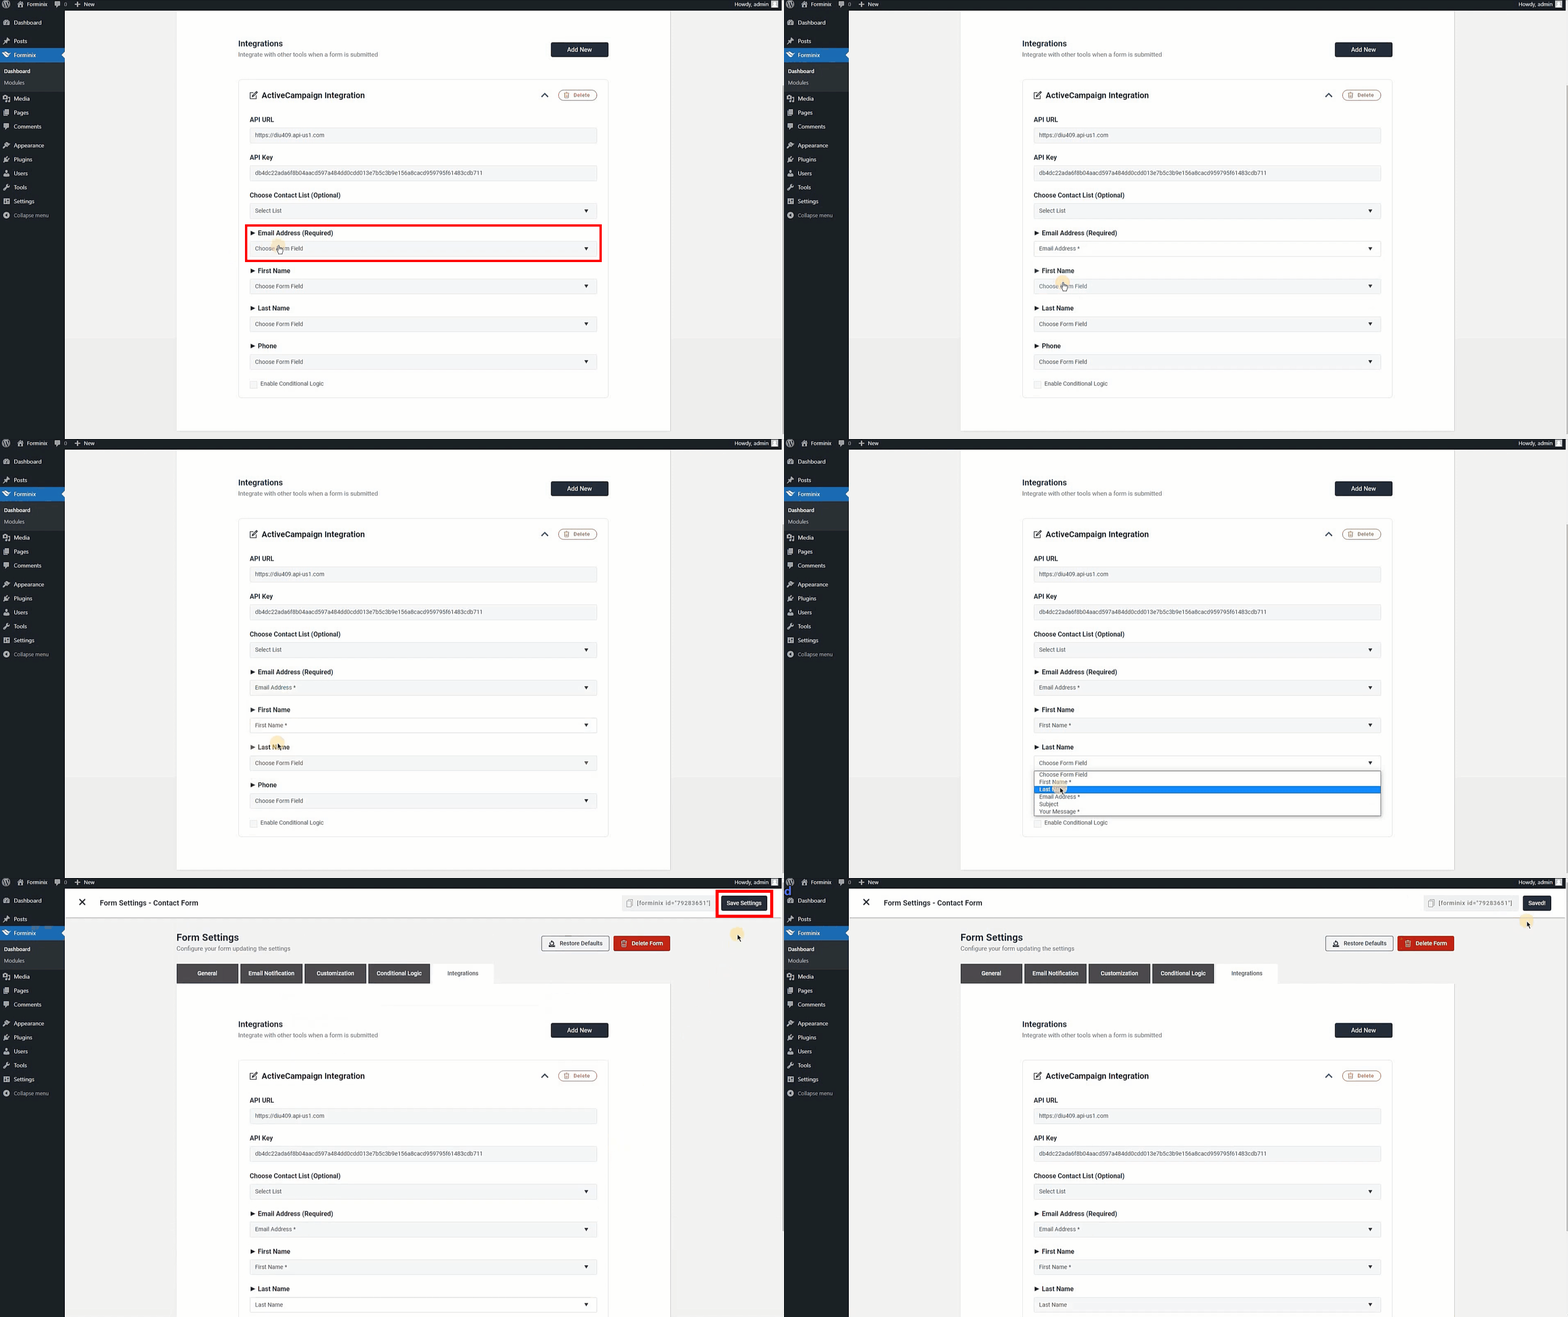
Here, in this tutorial we have chosen the “Email Address” field as the ActiveCampaign subscriber’s email address, “First Name” field as their first name and “Last Name” field as their last name.
Step 5: Saving All Settings and Testing WordPress ActiveCampaign Integration
At last, to finish up the setup we have to save all our settings that we have made so far. So, just click on the “Save Settings” button at the top right corner in Forminix plugin page.
Now let’s start testing our new ActiveCampaign integration setup and see how everything works.
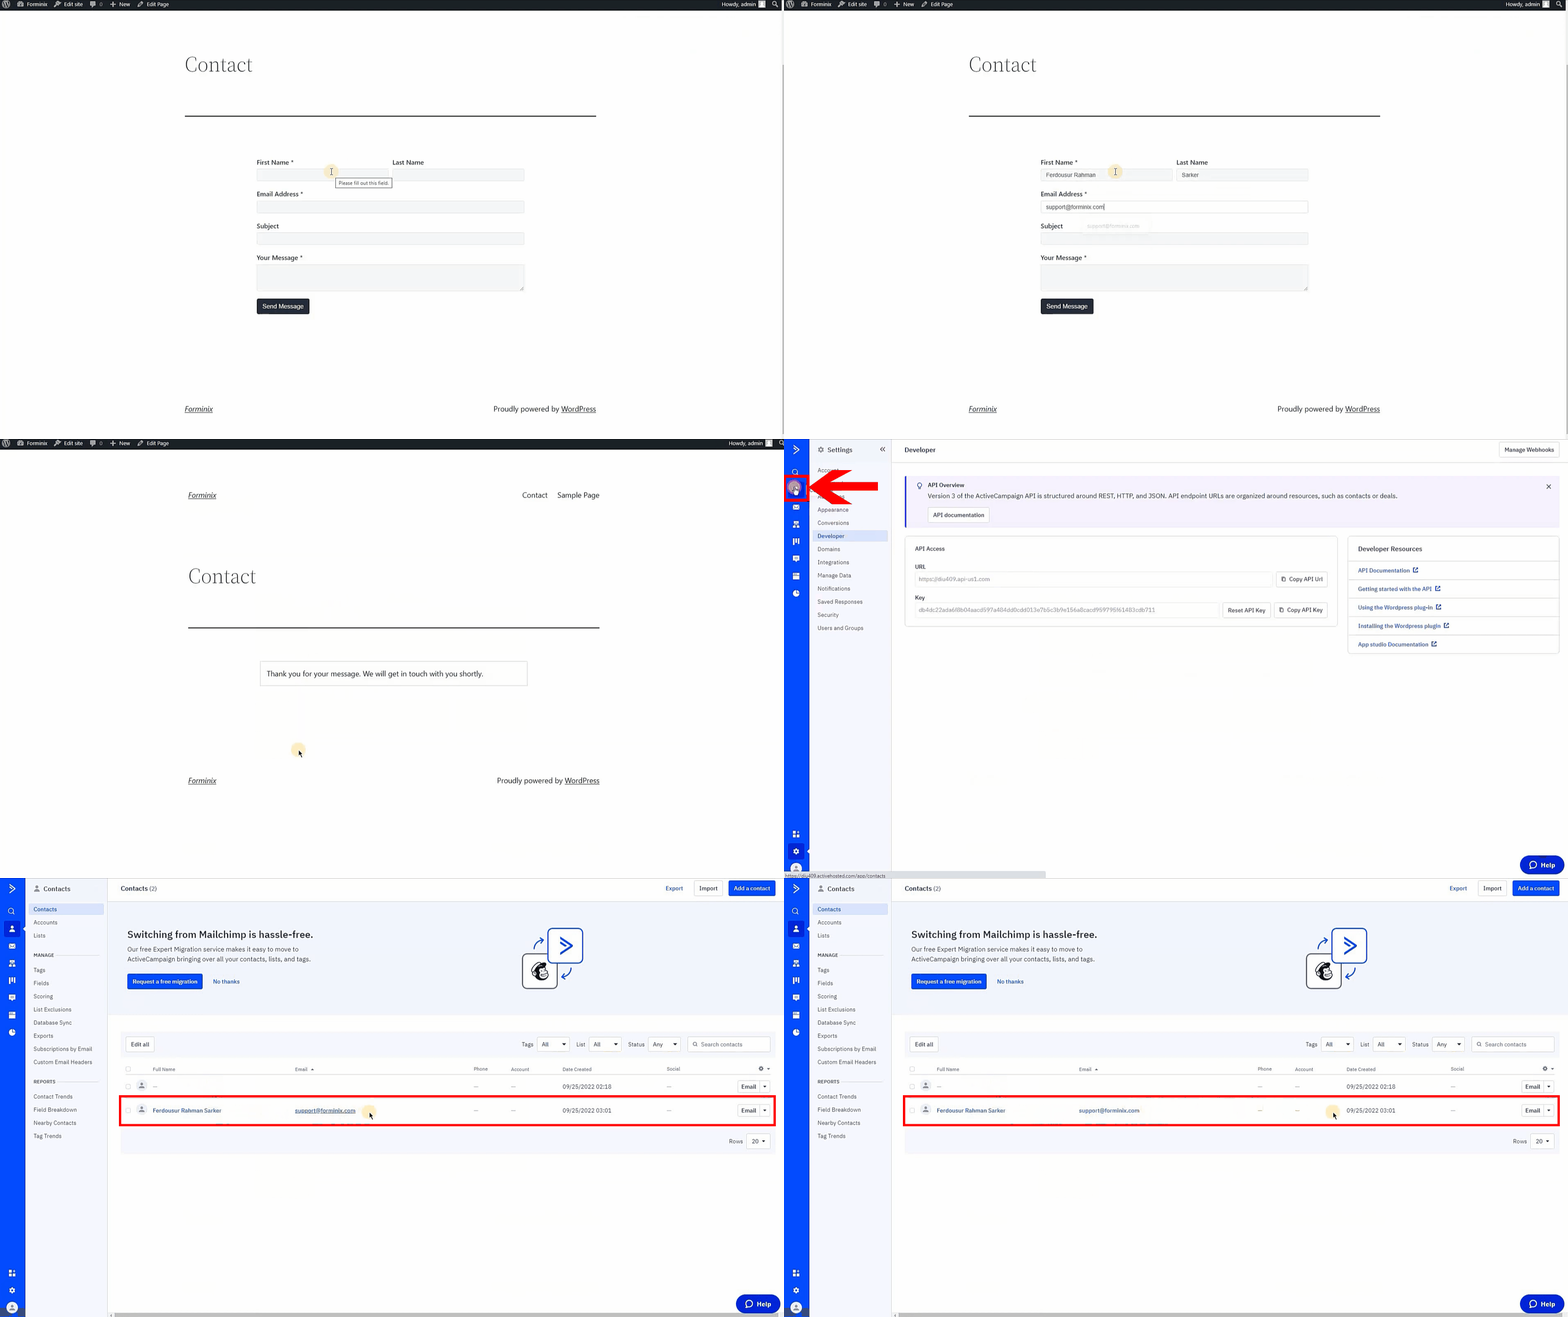
Great! Our WordPress ActiveCampaign integration is working as properly as expected.
To see the user profiles in your contact list, simply navigate to the “Contacts” option at the top left side on your ActiveCampaign dashboard (as shown above).
Here you will see all your users and the mapped form info inside the contact list.
Do note that, if you encounter any issue and face any error, just backtrack to all the previous steps and check for mistakes (if any). Fix them and try again, you will be all good.
So, this is it, now you know how to connect your ActiveCampaign with WordPress form(s) in Forminix Form Builder.
Final Words
In this tutorial we have showed you all the required steps to connect your ActiveCampaign with WordPress form(s). Besides it will take you no more than 2 minutes to complete the setup.
We hope that you can now setup your WordPress ActiveCampaign integration on your own. Make your ActiveCampaign email marketing and CRM automation experience better and greater with the new Forminix integration.
Do a lot more with your WordPress forms, make them powerful and reach new ends with Forminix Form Builder. Your trust and support are very much appreciated and needed for our overall progress and development.
So, what are you waiting for? Start adding subscribers from your WordPress to ActiveCampaign contact list quickly and easily through simple form submissions.
Last but not the least, please leave your comment down below. Have any queries and suggestions? You are most welcome to post them as well.
Until next time, Take Care!


